LightZone for Aperture 3 Users
For today’s guest post, Tim Kennedy returns; his previous piece was “Catapult and Aperture 3”. Tim is a partner in Kennedy Photomedia as a photographer, writer, and teacher. You can read more about him and see Tim’s work at kennedyphotomedia.com.
Introduction
Walk back in time with me. It’s December 2007. Aperture is 2 years old, at version 1.5 and $499. Lightroom is just out and $299. Photoshop is CS3, the dominant photo editing tool, and $649 unless you want the extras. The “Extended” version is a hefty $999. By comparison, Light Craft’s LightZone is at 3.0 and competitively priced at less than $250. In fact it’s just been named to the list of Macworld’s 23rd Annual Editors’ Choice Awards. To quote Macworld, LightZone is an “efficient, streamlined piece of software that offers a unique approach to photo editing for a good deal less than what you’d pay for Photoshop.”
Jump forward to 2013. Lightroom is the dominant photo editing tool and Adobe has rebranded it by shoving “Photoshop” into the name. Aperture is still in the fight and a new version is likely around the corner.
And LightZone who? By 2013, Light Crafts has closed, its founder now works for Apple, and LightZone has been crushed into oblivion, a casualty in the battle between Adobe and Apple.
Maybe.
LightZone 4.0
2013 finds LightZone resurrected to 4.0. Now a free to download “open source” photo editing tool maintained by the LightZone Project.
Why should we care? Well the price is right and LightZone still has a few old but unmatched tricks up its sleeves. For the Aperture user who typically sends their images out to other plug-ins, these LightZone tricks might prove worth a closer look. But to get there, we need to take a moment to look at what LightZone was.

So what made LightZone so unique in its day? At a time when most photo editing was still one at a time in Photoshop, LightZone offered basic photo management. But even more unique for the time, LightZone emphasized a non-destructive workflow. LightZone copied the RAW master data to create a new reference file. Into this new file, you could apply edits in stacks. You could even apply those editing tools very selectively and they were smart enough to work with the visual content to only change what you wanted to fix. Plus, you could go back in and change your mind later. No original pixels were harmed. When you were all done, the visible reference image acted as a guide for the new conversion that pulled photo data from the original RAW master.
Sounds almost like an early draft for Aperture 3.0 and later versions of Lightroom, right?
By 3.0, LightZone was ahead of its time and competition. Still, it suffered from some quirks. Built in Java, it might have become the next Web-based editor. But it stayed on the desktop where it could be a bit unstable. A machine sometimes struggled with more complex edits. Adding on to that, too many photographers at that time didn’t quite grasp RAW and the whole “non-destructive thing” in the first place.
These days, LightZone suddenly seems pretty spry. Machines are much faster and Java is more stable. A lot of the basic functionality is still legacy code without all the modern bloat. LightZone seems to cook along. Originally it was designed as your one-stop shop, with both asset management and editing features. However unless you don’t have Aperture, Lightroom, or Photo Mechanic, I wouldn’t encourage anyone to use LightZone to manage their photo library. Asset management was never LightZone’s best feature and other more powerful tools do a better job with more images. Processing your images is another matter. If you’re regularly shuttling out to Nik plug-ins or other tools that copy your RAW file and then lock the results in a fixed and flattened file, LightZone might prove more effective. Unlike many of these tools, LightZone lets you go back and tweak.
LightZone is free from LightZoneProject.org. As of this writing, the Mac version is still in beta and interested users will need to register and ask to join in on the beta test. The community is helpful and many Mac users have already posted tips for how to use LightZone with Aperture. You’ll find documentation and a new YouTube channel to get you up and running quickly.
Using LightZone with Aperture
You’ll want to set LightZone as your editor and open your image as a TIFF. If you’re toggling back and forth between multiple editors, you might visit this tip on ApertureExpert.
Aperture users will find LightZone somewhat familiar. It offers a Browse-only mode which is very similar to Bridge or Aperture Split View, without the editing capabilities. Aperture will send your image past Browse and right into Edit.
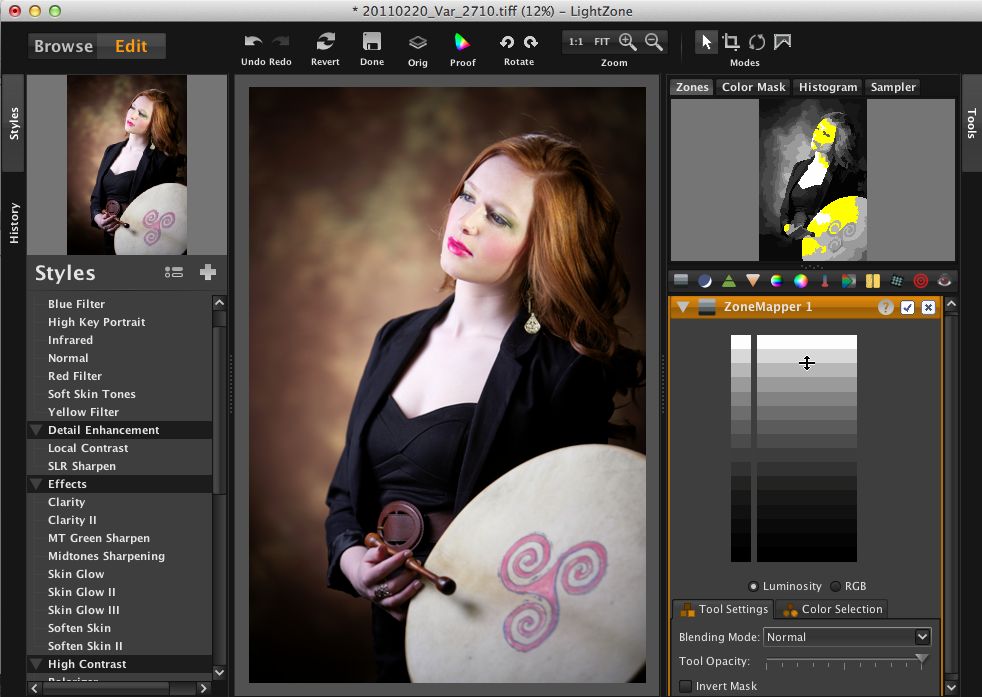 LightZone’s interface should feel familiar and be easy to learn
Your edited image is dead center. Across the top, you’ll find the usual Aperture-like tools with a couple powerful region masking tools that we’ll cover shortly. On the right is the tool stack. It is here that you stack up settings much like you would with Aperture. In the upper right is a preview window, where you have your usual previews. A sampler for numeric data about the image, a histogram… we’ve seen that all before. A color mask preview, too — handy but not unheard of. But then you see the ZoneFinder preview. Here, you can interactively analyze your image using a ZoneMapper tool. It’s a unique preview option that we would see later repeated in Nik Silver Efex Pro.
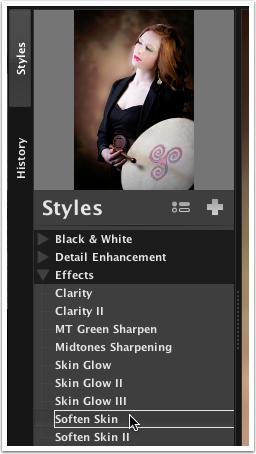 LightZone includes a variety of preset styles, and more can be added
To the left, you have styles that can be selected and previewed in the upper left hand corner. Just like Aperture Effects, you can use what is provided or create your own. A history tab provides a list of what you have done during the session.
Aperture is pretty powerful in its own right. Often, we use plug-ins and editors to do what Aperture could probably handle for itself. There are two reasons for this. First, most like the plug and play convenience. Click, click, click and you’re done. Second, sometimes another tool has an interface approach that somehow makes it easier to get at what you are trying to do. Nik’s U-Point solution is just this kind of tool.
LightZone’s best two tricks are probably the vector-based regions/masks and ZoneMapper.
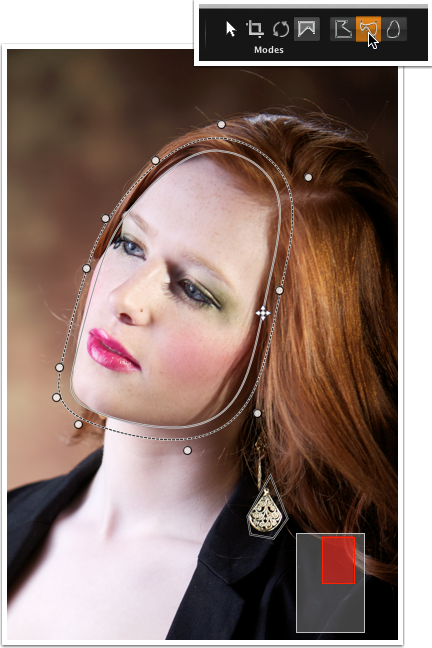 LightZone’s vector-based masking tool is one of its most attractive features
Vector-based regions create accurate selections, but these selections are drawn instead of brushed. It’s fast and reasonably intuitive once you try it. You can choose three different vector types and “drawing” is as easy as clicking. It also has an easily adjustable feathering option that, in practice, functions a lot like Aperture’s “Detect Edges.” You can break it and create a halo. In general practice, it’s easy to blend transitions and modify specific areas seamlessly. Being vectored based, these selections can be adjusted and readjusted at any time in the future. They can be copied and applied to other uses of tools in the stack. You can combine them further with color-based masks and blending modes. Since settings can be repeated again and and again in the tool stack, your work adjustments can be very specific and powerful.
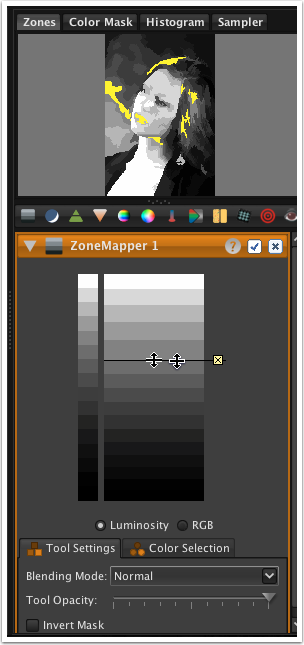 LightZone’s ZoneMapper will be a welcome tool to any student of the Ansel Adams zone system
ZoneMapper is an easier look at levels and curves. Rolling the cursor over the zones shows highlights in the ZoneFinder preview. Once you find the right zone, you can shift its value up and down freely. You can crush zones or spread them out. You can lower your whites and raise your blacks. Whether you’re working in B&W or color, ZoneMapper and ZoneFinder make value adjustments a breeze. It’s a tool that makes the whole LightZone process intuitive and fun.
The original LightZone promo material would highlight a few other neat features. The Relight tool gets you that extended range look out of your RAW file with a single click. Like Nik Color Efex, LightZone comes with a set of handy Styles. It’s easy to create your own Styles and the greater community shares many of their own. LightZone has been 16-bit since before it was fashionable and I’ve already mentioned the non-destructive workflow if you need it. In fact, it’s that non-destructive workflow that is so handy with Aperture.
If you’re a fan of using Nik with Aperture, you’re used to sending your image out to the plug-in. It comes back packaged as a flattened end result. If you were using Photoshop, a Nik plug-in could use Smart Filters and you could re-edit your work. Unfortunately, that’s not available when you use Nik plug-ins with Aperture.
Here’s the thing about LightZone. Throw your processing at the image and all that work is stored inside the file. You see the end result. But you can go back into that edit from Aperture and all of your settings are saved along with vector regions and masks. Tweak away. Save it back to Aperture. Change your mind, go right back in and tweak again. True, LightZone can’t match every Nik trick found in Viveza, Silver Efex, or Color Efex. But it can hit quite a few of the common Nik looks and do some things that Nik can’t. LightZone is not your answer to every photo processing issue. It’s just another tool that offers a unique way to get at some issues in a very powerful way.
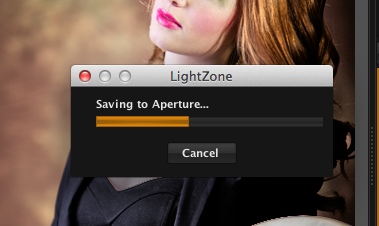 LightZone saving back to Aperture, albeit with some quirks you’ll want to work around
LightZone roundtrips with Aperture pretty effectively overall but it does have some quirks in the current version. In normal use as a RAW converter and editor, LightZone changes the filename of the reference file so that it is distinctly identified. Aperture doesn’t like name changes outside of Aperture. There are no problems when LightZone understands that the file is coming from Aperture. When it doesn’t, it places a new edited image back in the Aperture library that Aperture doesn’t know exists. The temporary work around for this issue is just to quit LightZone whenever you are done editing an image. That will prevent LightZone from tagging the filename. LightZone loads quickly so this seemingly kludgy workaround starts to resemble roundtrips to plug-ins that basically do the same thing.
Above all, editing your images in LightZone can be surprisingly fun. When Light Crafts closed, a loyal group of LightZone users kept at it partly because it is such a fun tool to explore. If you love Aperture brushes, my guess is that you’ll also enjoy LightZone vector-based regions. That you can dump an image to LightZone and still be able to edit those settings in the future makes it an ideal companion to the tools already in Aperture. That it’s free is truly enjoyable.

Comments
on October 1, 2013 - 12:00am
I was not aware of LightZone - this looks very interesting. Thanks for the article.
Still using Apple Aperture