Sponsored Post[?]
DxO PhotoLab 3: The New HSL Tool
By PhotoJoseph
October 24, 2019 - 3:00am
This is a series of posts I've written for the DxO Blog, which I am posting an excerpt of here for your enjoyment.
DxO PhotoLab 3 has just launched, and with it come some very exciting new features — the most colorful one being the new HSL (Hue / Saturation / Luminance) tool! In this article I’m going to show you just what it can do.
The New DxO PhotoLab 3 HSL Tool
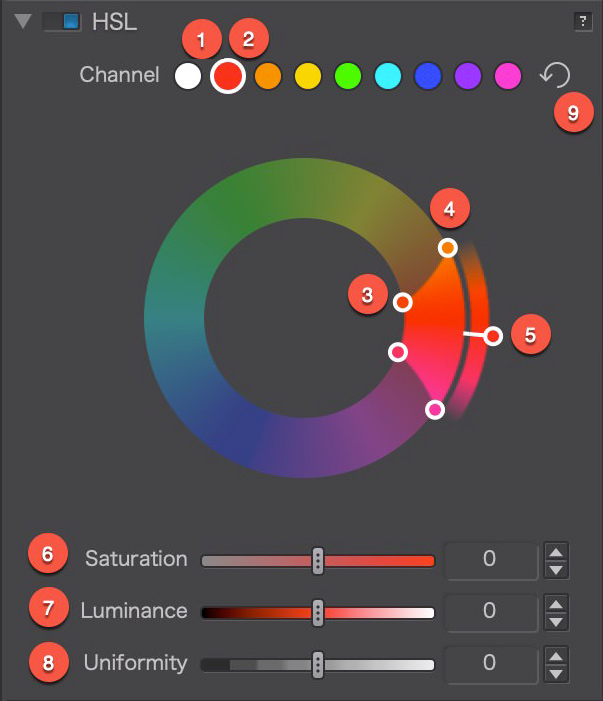
Before getting into using the new DxO PhotoLab 3 HSL tool, let’s have a look at what it is! Here’s a tour of the interface.

- Color channel selector (white selected) — When it’s white, you’re manipulating all. Notice how Luminance and Uniformity are disabled, as well as the hue range selector.
- Color channel selector (red selected) — When you choose a color chip here, that corresponding color range is selected on the hue wheel. This is the color range you will be manipulating. Note that each of these “chips” are presets, but each can be adjusted.
- Primary hue selection range tool — These two inner selectors define the range of color you will be manipulating.
- Feathered edge of the hue range — By moving these dots, you are expanding or contracting the extent of feathering of the color range.
- Hue rotation slider — This rotates the hue through the color wheel. When the “white” channel is selected (left screenshot), this will rotate all hues. When a color range is selected (right screenshot), this will adjust only the selected hue range.
- Saturation slider — Increase or decrease the Saturation of the selected hue range.
- Luminance slider — Increase or decrease the Luminance of the selected hue range.
- Uniformity slider — Compresses or expands the colors in the range selected, making the more alike or more different. This is generally used to even out skin tones, and make skin appear more uniform in color.
- Reset button
(post continued on DxO's Blog; link below…)
To read the rest of this article, please visit the DxO Blog!
