Mimicking your Photo Mechanic 5 Workflow in Aperture 3
In an earlier post and video series “The Photo Mechanic 5 vs Aperture 3 Video”, we showed just how massively Aperture can beat Photo Mechanic in a time sensitive workflow (and non-rushed as well, of course). In this post, I'll aim to show you how to transition from Photo Mechanic to Aperture. These tips are the result of the time spent with Olympic photographer Jeff Cable, and so this is primarily tailored to his workflow. However he wasn't doing anything out of the ordinary in Photo Mechanic, so I think this will pertain to most Photo Mechanic users.
For the first part of this workflow, importing your images, be sure to check out the post “How to Import Multiple Cards Simultaneously and Bypass Thumbnail Generation on Import in Aperture 3”. That covers the ever-important task of actually ingesting your photos into Aperture and coming to a stage of ready-for-editing more quickly than you can into Photo Mechanic (about… 10 seconds).
Replicating the touch and feel of Photo Mechanic
Part of the reason any photographer is as quick as they are in editing photos (regardless of the software they use) is because they know the system really really well, and use keyboard shortcuts instead of the mouse wherever possible. If I told you that Aperture was faster but that you'd have to spend a month getting used to a new workflow, you'd laugh me away. So this first part is about the tagging system and keyboard shortcuts Photo Mechanic users are familiar with. By adopting these steps, which will take very little time to set up, you'll by flying along with Aperture as quickly as you did in Photo Mechanic in no time at all.
Matching color classes
Aperture's default workflow for ratings is for you to rate your images 1 through 5 stars, or “reject”. So really you have seven possible states, including –1, 0, 1, 2, 3, 4 and 5 stars. The keyboard shortcut for those is the same as the rating; 1 star is the 1 key, 5 stars is 5, and reject [-1] is 9 (or you can tap the – key to lower the rating one stage, and since they all start at zero, – key makes it –1). Aperture also gives you color labels, which by default don't have any special meaning to them.
Photo Mechanic however uses a different system, again by default (it can use star ratings too if you prefer). It's color rating system, called “Color Classes”, looks like this:
 Photo Mechanic’s “Color Classes” can easily be replicated in Aperture 3
So let's set up these same color labels in Aperture. You may have noticed that Photo Mechanic has eight colors, while Aperture has seven—however that eighth Photo Mechanic color is “trash” which in Aperture we'd call a reject. So, nothing lost, I believe.
Below you see the Aperture preferences, and the Labels tab. In this situation, we made purple, red, orange and yellow the same as in Photo Mechanic; specifically “Winner”, “Winner alt”, “Superior” and “Superior alt”. For Jeff's workflow, the remaining “Typical” and “Extras” aren't useful to him, so he uses “Extras” (Blue) as “Vendor”, so we set up the color label in Aperture that way. (“Vendor” to Jeff means an image he might send to a vendor, such as the florist or caterer, for a wedding or Mitzvah).
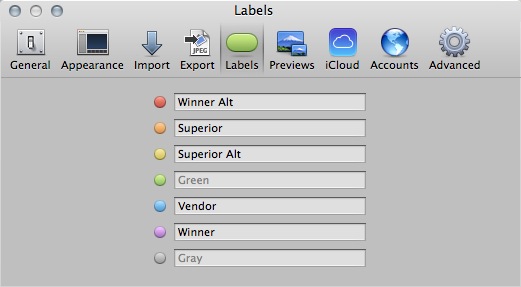 This is Aperture’s color labels, with the Photo Mechanic terms matched to each color
OK, color labels are done. Now on to keyboard shortcuts.
Matching keyboard shortcuts
You can see the Photo Mechanic shortcuts next to the colors in the screenshot above; 1=purple/”Winner”, 2=red/”Winner alt”, and so-on.
Aperture's keyboard shortcut editor, or Command Editor, is pretty awesome. You can reassign just about anything, and it's really easy to do. First, go to the menu Aperture > Commands > Customize… and that'll open the editor.
If you've never been in here before, the first time you try to change anything, Aperture will prompt you to duplicate the command set and make your own. Or you can preempt that by clicking the menu in the top left of the editor and choosing Duplicate.
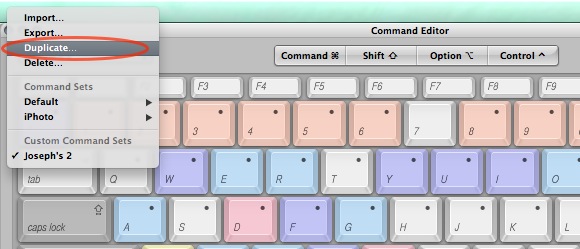 Duplicate an existing command set and name it as your own
From there it's just a case of finding the command you want to remap, and tapping that shortcut on the keys. If it's already in use, Aperture will ask you if you want to replace it. In the screenshot below, notice three things. First, in the top right, I've searched for “set color”, which as you can see from the Command list at the bottom, that matched all of the shortcuts we need, including “Set Color Label to Red”, and all the rest of the colors too. Once the “red” one is selected in the list, just tap the shortcut you want. In this case, I tapped the “2” key (no modifier), and Aperture warned me that this was in use by “Set Rating as 2 Stars”. One click of Reassign is all that is needed.
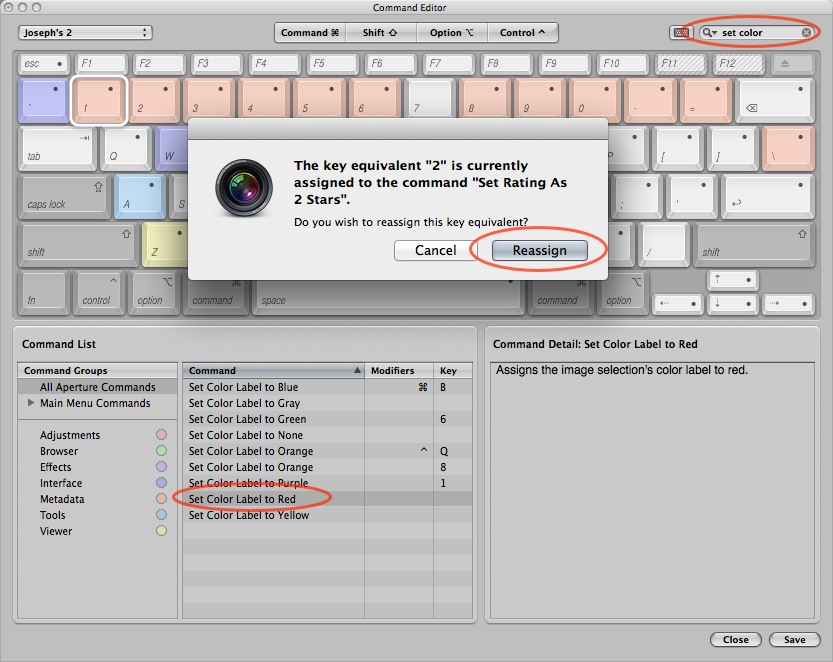 You can reassign the keyboard shortcuts in Aperture to match those in Photo Mechanic, so purple=1, red=2, etc.
Do that for the rest of the colors you use, then save and close this dialog.
Once you've remapped all the necessary commands, we're ready to move on to search.
Filtering your photos
For quick searches by a single color, click the search menu drop down that shows up above the thumbnails, and choose a color label from the list. Keep in mind that if you want, you can assign keyboard shortcuts to these as well. By default there aren't any.
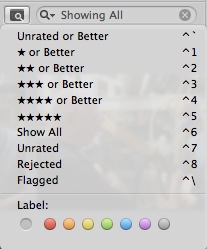 The quick search menu lets you quickly find images rated or color tagged
Personally though I think the faster way to handle this is to create a series of Smart Albums that show likely search parameters. This way you can search by a single color, or combinations of colors.
To create a Smart Album, go File > New > Smart Album or click the big + button on the toolbar and choose Smart Album, or of course just hit Shift-Command-L. You can name it whatever you like, and set any combination of search criteria. In the two examples below, I built one as “Winner Alt” to show just the red labeled photos, and in the second, I made one that shows “All Picks”, revealing any image with purple, red, orange, or yellow assigned to it.
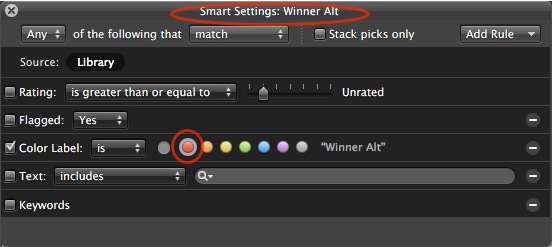 This Smart Album is set to show just the red, or “Winner Alt” photos
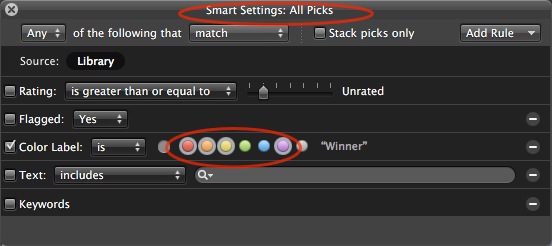 This Smart Album is set to show “All Picks”, which includes red, orange, yellow and purple tagged photos, i.e. Superior, Superior Alt, Winner and Winner Alt
You can of course customize these to show whatever you want to see, and make as many Smart Albums as you like.
For those who enjoy Photo Mechanic's quick filtering by color, by clicking to enable/disable colors on this color bar…
 This Photo Mechanic color bar filter is showing us only red, orange and green tagged photos
…you can do the same thing in Aperture by opening the advanced search window, and enable/disable the colors you want there. It is, admittedly, one more click. But the option is there.
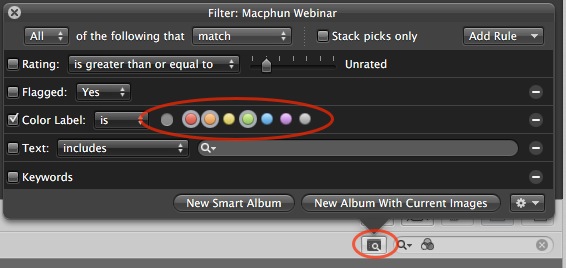 The Aperture search filter allows us to search by colors the same way. here showing us again only red, orange and green tagged photos
Personally I think I'd favor the Smart Album approach, but it's all up to the individual.
By the way, I recently completed a Live Training on Smart Albums and Search. If you're new to Aperture, and planning to utilize this feature, you'll definitely want to check out “Live Training Session 104: Smart Albums & Search”.
Adding metadata
Now let's move on to metadata. This will include keywords, captions, and IPTC data.
Copyright and other critical metadata
As with Photo Mechanic, you have metadata presets. Go to the menu Aperture > Presets > Metadata… to access the main metadata preset window. From here you can create a series of presets for a variety of situations. To create a new one, use the gear menu in the lower left corner. The two you currently see listed are my baseline setups; one for on-location work, and one for in-studio work. I can replicate either of these and fill in additional data, such as client info, location data, etc. if I know I'll be importing repeatedly on the same shoot. By enabling a field but leaving it blank. you'll see this metadata field when you access the preset, but it'll be empty, awaiting your input. Captions and Keywords are prime candidates for this; you may want to apply the same caption or keywords (at least as a starting point) to every image from one import session, but these are likely to be different from import to import, so you don't want to make them a permanent part of your metadata preset.
The only difference between my two presets below is the Location, City, State etc. data is pre-populated for my in-studio shoots.
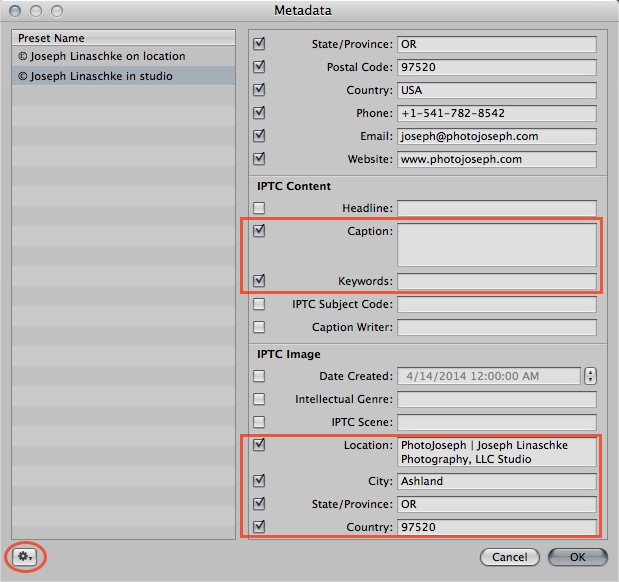 With Metadata presets, you can prepare any number of metadata combinations for your photos
Once you've set that up, there are two times to access a preset and apply it to your photos; at the time of import, or after import. If you're importing using the standard import dialog box, then it'll be one of the many options you have available at the time. You can choose your preset, fill in any blanks (if necessary), and the metadata will be applied on import. If however you're using the new super fast import method, metadata presets are unfortunately not available at the time of import. Fortunately it's extremely easy to do afterwards. Simply select all of your images, and choose the menu Metadata > Batch Change… [Shift-Command-B] and proceed as before.
Captions & keywords
There are several ways and places/times to add keywords and captions to your images. If you type the same thing repeatedly (as most do), the next two sections on autofill and auto-expanding text will be of particular interest. But for now let's focus on the where and how of adding this ever-important metadata.
You've already seen that you can type the data in using the Metadata presets. So that's one method. Keep in mind you can access the batch change at any time, so even if you've already added primary metadata to your photos, you could still choose to batch change all photos and just add a caption or keywords to them—simply create a preset with just captions and keywords, and select that from the Batch Change list, as below.
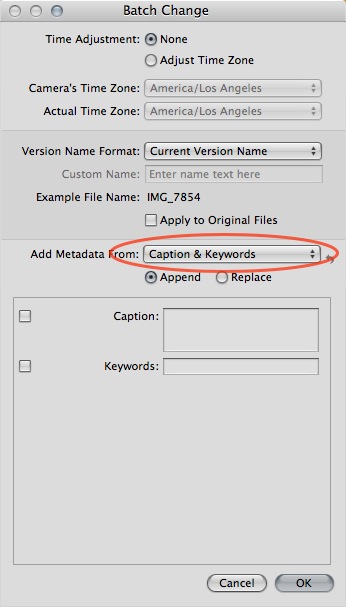 Batch Change gives you access to all kinds of changes, including your metadata presets
You can also caption and keyword your images from the Info tab. In the screenshots below, I've shown two metadata views; “General info” which includes caption, keyword and some more, as well as “Large Caption” which shows just the caption field, in larger text.
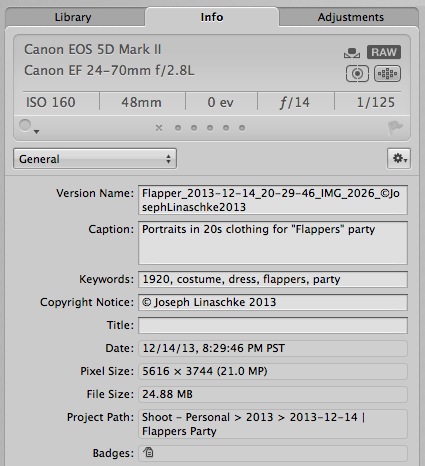 The ‘General” metadata view shows several fields of info, including Caption and Keywords
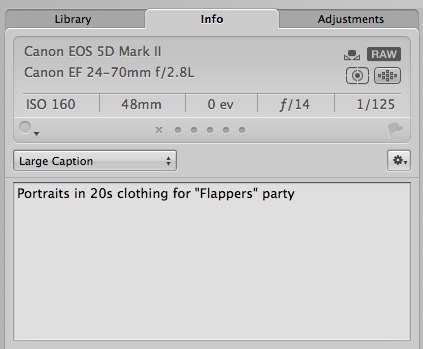 The “Large Caption” preset shows just the Caption, and makes it a larger window with larger text
You can navigate this entirely with the keyboard. Once you've chosen a view like “Large Caption”, click in the text field to type your caption, then command-right arrow to go to the next photo, type the caption, command-right arrow again, and so-on. The same applies with keywords, and if you made a custom view that showed just captions and keywords, you could type caption, tab to keyword, type keywords, tab to caption, command-right arrow to next photo, repeat. As you're typing these in, Aperture's own autofill will complete the text for you if you've already typed that phrase before.
Keywords only
You can access your keywords list by choosing Window > Show Keywords HUD (Head's Up Display), and add, delete, rearrange, import and export keywords from here. You can also drag a keyword from this list to a photo, but that's not terribly efficient. Also you don't have to add keywords here. If you type a keyword into a photo that doesn't already exist, it'll be automatically added. One nice thing about Aperture's keyword implementation is that they are all managed from one place and part of a database, so if you want to change a keyword (data changed, you misspelled it, whatever), you don't have to locate every image with that keyword. Just open the HUD, locate the offending keyword, and change it. Aperture will notify you that you're about to change the keyword on 12,412 photos or whatever it is. Also know that if you import images that already have keywords applied, those keywords will automatically be added to this database.
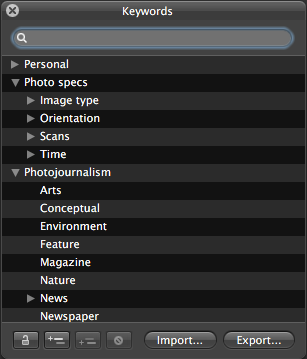 The Keywords HUD (Head’s Up Display) shows all available keywords and lets you add, delete, import and export your sets
The methods of adding keywords we've already explored are typing them at import or in batch change, typing in the info panel, or dragging them from the HUD. The last method to point out is using keyword sets. First, select Window > Show Keyword Controls which will open a bar at the bottom of your Aperture window with a row of keyword buttons. You can create as many button collections as you like from the Edit Buttons… option, and each button has a keyboard shortcut assigned to it (which of course you can change).
 The keyword button sets can be a very useful method for quickly adding keywords to images
Simply select your photo(s), click the button, and move on.
AutoFill text
The first time you type something into a metadata field, Aperture will store that in it's autofill database. The next time you start typing it, Aperture will show the most likely match and autofill it. If it's not right, just keep tying normally. If it is, you can tab to the next field or Command-arrow to the next photo, and that text will stay behind.
If you want edit that list, including deleting no longer needed ones, go to Metadata > Edit AutoFill List… and make whatever changes you need. As you can see, this isn't just about Captions.
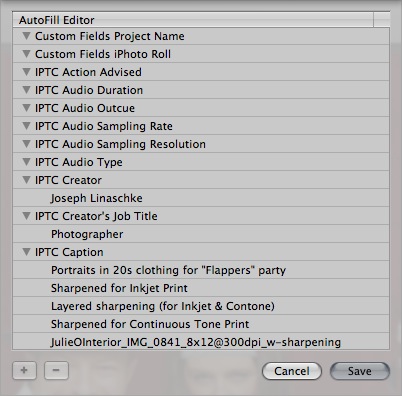 The AutoFill Editor allows you to modify, add or delete any AutoFill preset from a wide variety of metadata fields
AutoFill only goes so far though. The next level is auto-expanding (or auto replacing) text.
Auto-expanding (replacing) text
One of Photo Mechanic's big advantages is how it handles captioning. Or at least that's what I'm told; I have zero experience with it, except to understand that a) it's a lot better and quicker than Aperture's, and b) it has some kind of built-in text expansion, i.e. you can type “p1” and that'll expand to the name, team, etc. of player 1, for example. Since I don't really know how all this works in Photo Mechanic, I can't offer a step-by-step comparison but I can tell you how to do this in Aperture.
Aperture does not have a dedicated auto expansion tool built into it, however the operating system does. OS X will allow you to set up any series of letters and numbers to auto expand to anything you like. Simply open the System Preferences and Keyboard, then Text. As you'll see there are many built in, such as if you type 1/2 it'll be replaced with ½, or if you type (c) it'll be replaced with © . You can create your own, however there are several limitations to this system.
- This is system wide (and will even carry over to your iOS devices), so if you want to use something common like “bob” to expand to “Bob Jones, Team USA, player #1”, you'll find that you can never use “bob” in any other sentence, anywhere, without having to cancel or undo the auto expansion.
- You can't precede a character with a symbol. For example, if you wanted to eliminate the “bob” problem by typing “-bob”, that doesn't work. You can make it “bob-” but because of predictive input, the OS will assume you're typing your shortcut and you'll have to cancel it every time. No bueno.
- You can't have any smart characters, like today's date or current time added in. It's just plain text.
The OS's text replacement is great for many uses, but not for everything. So my preferred system is something called TextExpander. It's incredibly versatile, and I use it constantly. According to it's built-in stats, I've expanded over 12,000 snippets since installing it. For Aperture, one of my favorites is “ymd” which expands to the current year, month and day followed by a space-bar-space, so it looks like this: “2014-04-14 | ”. I use this as the starting name for projects in Aperture, project folders in the finder, and many other places. Additionally, you can limit if an expander is system-wide, or just to a specific app.
As you can see, you can make this do anything. Any couple of characters can become any amount of text. Here's an example.
From the screenshot below, you can see the setup. Typing the letters “p3” will expand using plain text as well as macros for day of the week (%A), year (%B), and so-on, giving us “Babe Ruth, #3, Pitcher, New York Yankees, Monday April 14, 2014”. If you need to caption all the players in a photo, identifying their jersey number is all you need to do. Neat.
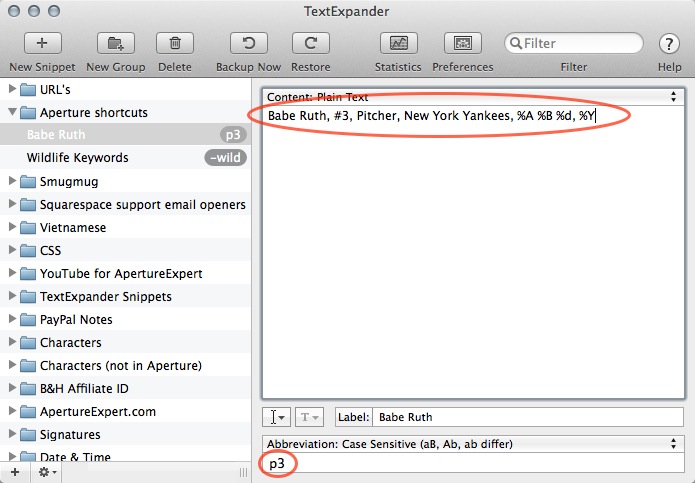 TextExpander offers a myriad of text replacement options
Personally, TextExpander is one of those must-haves for me, and until I install it on a new Mac, the computer seems almost foreign to me!
Are you a switcher?
I hope this was helpful to you. If you are a Photo Mechanic user considering switching to Aperture, and don't see a part of your workflow outlined below that you want to know how to convert, let me know in the comments and I'll do my best to address it. Be specific though; I'm not a Photo Mechanic user myself, so there's a lot I don't know about it.

Comments
on April 15, 2014 - 4:01pm
Whoa…a whole lot of useful info here even if you’re not a Photo Mechanic user! Thanks again, Joseph!
Florian
Florian Cortese
www.fotosbyflorian.com
on April 15, 2014 - 6:29pm
One thing to add as far as Photo Mechanic’s Code Replacement feature.
There is an online service offered by a very industrious SportsShooter who offers prepared rosters of all the major professional and large college sports teams. This is a fee based service, though if you shoot enough of those teams, it is worth it’s weight in gold for the time it saves.
Fortunately, the rosters can be used in TextExpander seamlessly which offers the user the ability to use those shortcuts system wide … if you ever have to send a caption via email, make a blog post or otherwise invoke all the goodness TE offers … it is available. Conversely, PM’s Code Replacement is only available in a single app. Switching to Aperture 3/TextExpander workflow would offer zero loss of effort in this respect.
If you shoot smaller college and high school sports, it is quite easy to copy rosters from online sites, perform some subtle magic in Excel or Numbers by deleting unwanted info, adding your own as needed, then export the results as Tab delineated data, import that file into TextExpander and you are ready to employ the data in your captions.
on April 28, 2014 - 3:21pm
Hi Joseph,
really impressive. I’m very new to Aperture but I love it from the first moment. I use Photo Mechanic since 2 years now and I think with your tipps I switch.
But there is one thing left: Variables in Photo Mechanic, i.e. in IPTC fields, i.e I generate captions and headlines out of IPTC and camera data. Do you know a solution for Aperture, maybe an Applescript?
Thank’s for sharing your knowledge.
Andreas
on May 10, 2014 - 10:02pm
Andreas,
Sorry for the delayed response. I'm not familiar with “variables” so am not sure I follow. Would a variable be something like, if in a caption you put
"This photo shot on <<EXIF Camera Model>> using a << EXIF Camera Lens>>", then it auto-filled the two EXIF data fields?@PhotoJoseph
— Have you signed up for the mailing list?
on May 11, 2014 - 12:05pm
Hi Joseph,
yes, something like this for i.e captions:
“{headline} im/in {location}, {state}, {country} am {iptcmonthname} {iptcday0} {iptcyear4}. {credit}”
Variables can be used for renaming, foldersettings and so on. It is a powerfull feature in Photo Mechanic. Anoteher example for renaming photos during ingest:
“{iptcyear4}{iptcmonth0}{iptcday0}_{frame}_{model}_{lens}mm_f{aperture}_asr”
Andreas
on May 12, 2014 - 1:22am
Got it. That's awesome. And I've been begging for that feature in Aperture for years now. Didn't know that PM did it (or maybe I did… I dunno). Anyway, no, there's nothing quite like that. On rename, you can do date and time, but not any EXIF data.
Here are the variables you have for file naming…
And again for folder naming…
So, not quite all the options you're looking for, unfortunately.
@PhotoJoseph
— Have you signed up for the mailing list?