I want to place 5 photos onto a colored background, and I want the photos to fade into the background color. Can I do this with transparent edges using Pixelmator?
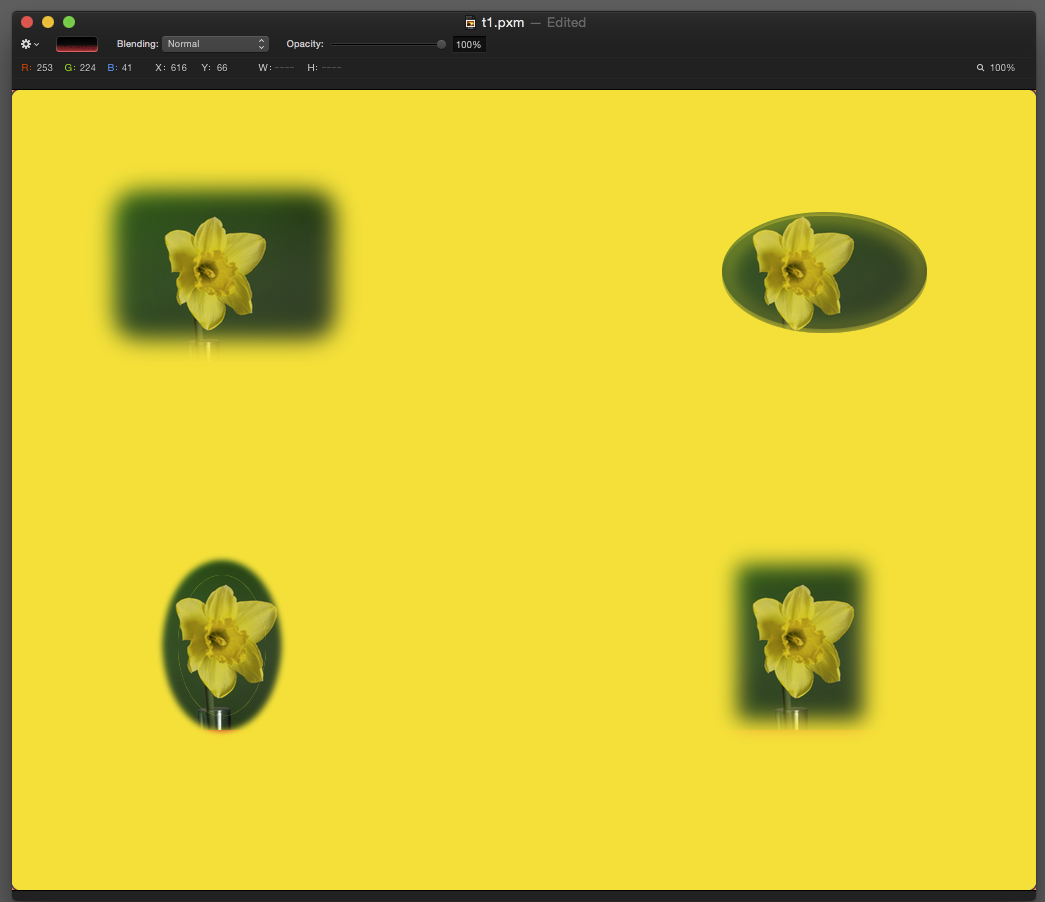
Here is an example. Bottom one is not well done, but I think the top image( yellow Daffi) is what you are looking for. Perhaps a PM for the details .. be glad to help.
Thank you Bill–I don’t know how to PM here. I’d like very much to get the details, so if you can tell me how to PM on this forum, that would be great. Both examples are pertinent. The second one has a larger fade area but still has edges, which is what you meant by not well done, I think. I also want to make it an oval image, fading to transparent. I haven’t found that capability in Pixelmator. I’ll be waiting to hear!
I could not find the PM either, so here goes. You will have to do a fair bit of experimenting to get this to your liking!
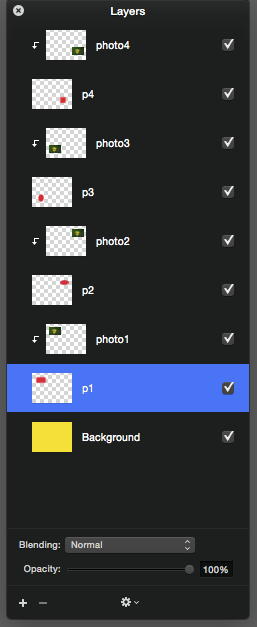
Create your Background layer (red one in my example) then place your photos in layers above.
Select layer with Photo1. In Tools, select Shape Tool and drag a rectangle over the Photo1 (This will be in a new layer). The Shape should match the Background colour. If you reduce its opacity, you can see where to place it and size it to cover the Photo1 with some margin to spare.
Here’s where the fun begins. With the Shape Layer selected - In the Styles menu, at the top select Fill Gradient. Click on the colour swatch to see the Gradient menu. What you need is a gradient that goes from solid background colour (the bucket on the right) to the same on the left, but change the opacity of the left bucket to zero. Also check the Radial style gradient in this menu. Now by moving the gradient bucket sliders to the right you can see the effects on your image. Finally, you can select the Shape layer, right click and choose Convert into Pixels. Then you can Transform the Shape to get from round to oval. You may have to mask the Photo1 a bit to get rid of some stray edges after mucking about with the Shape layer.
As I am testing this, there is more to it than I know, so you will have to try stuff as you progress. Suggest a few tests before working on a real project,. Good luck.
Just figured out the easy way for both rectangular and oval cuts. Here we go again!
Place Photos above the background. Select Photo1. Put a blank layer beneath Photo1 and with this layer, grab a marquee too (your choice of shape (oval or rectangle) and make a selection. Now refine the selection e.g. Smooth 20% feather 20. All you see is the marching ants at this point. Fill the selection with your background colour using the paint bucket. (reminder - this is on the layer below the PHoto1 image.) So you will have a layer with the blob of a background colour. Go up to the Photo1 layer and right click - choose Create Clipping Mask. Voila! You’re done. Repeat for the other photos on your collage.
Man, this was a lot better than my first attempt. Hope I did not cost you too much time.
Bill, this second explanation doesn’t really fade to transparent, though, does it? You’d need to save the chosen background color and use that for the background of the montage, right? I was hoping to be able to fade to transparent so I could just experiment with different backgrounds. Your first tutorial seems to give the transparency by changing the opacity to zero??
If you have two layers - Top Photo / bottom selection square/circle - you select the top layer and Create Clipping Mask. Result is that any pixels existing in the bottom layer will allow the corresponding pixels in the top layer to be revealed. Colour is not important.
So we make pairs of top/bottom layers. Use the marquee tool to make a selection. You may want to Refine Selection to adjust Size/Smooth/Feather. Select the bottom layer and fill the selection with a colour(paint bucket tool). Then select the top layer and Create Clipping Mask. When all your photos are paired up, you can add a background layer of whatever colour you choose. Put this layer on the bottom of the stack.
Thank you SO much–I’ll try this as soon as I can!! Then I’ll post back–the fade on the oval vignettes doesn’t seem to be as much as on the rectangular ones???
Keep in mind, there is usually more than one way to do things in Pixelmator/Photoshop/whatever software. So experiment until you get what you need and get there in a reasonable number of steps. Have fun. You can’t really break anything.
Here is an example. Bottom one is not well done, but I think the top image( yellow Daffi) is what you are looking for. Perhaps a PM for the details .. be glad to help.
Bill Booth
Thank you Bill–I don’t know how to PM here. I’d like very much to get the details, so if you can tell me how to PM on this forum, that would be great. Both examples are pertinent. The second one has a larger fade area but still has edges, which is what you meant by not well done, I think. I also want to make it an oval image, fading to transparent. I haven’t found that capability in Pixelmator. I’ll be waiting to hear!
Franny
I could not find the PM either, so here goes. You will have to do a fair bit of experimenting to get this to your liking!
Create your Background layer (red one in my example) then place your photos in layers above.
Select layer with Photo1. In Tools, select Shape Tool and drag a rectangle over the Photo1 (This will be in a new layer). The Shape should match the Background colour. If you reduce its opacity, you can see where to place it and size it to cover the Photo1 with some margin to spare.
Here’s where the fun begins. With the Shape Layer selected - In the Styles menu, at the top select Fill Gradient. Click on the colour swatch to see the Gradient menu. What you need is a gradient that goes from solid background colour (the bucket on the right) to the same on the left, but change the opacity of the left bucket to zero. Also check the Radial style gradient in this menu. Now by moving the gradient bucket sliders to the right you can see the effects on your image. Finally, you can select the Shape layer, right click and choose Convert into Pixels. Then you can Transform the Shape to get from round to oval. You may have to mask the Photo1 a bit to get rid of some stray edges after mucking about with the Shape layer.
As I am testing this, there is more to it than I know, so you will have to try stuff as you progress. Suggest a few tests before working on a real project,. Good luck.
Bill Booth
Just figured out the easy way for both rectangular and oval cuts. Here we go again!
Place Photos above the background.
Select Photo1. Put a blank layer beneath Photo1 and with this layer, grab a marquee too (your choice of shape (oval or rectangle) and make a selection. Now refine the selection e.g. Smooth 20% feather 20. All you see is the marching ants at this point.
Fill the selection with your background colour using the paint bucket. (reminder - this is on the layer below the PHoto1 image.) So you will have a layer with the blob of a background colour. Go up to the Photo1 layer and right click - choose Create Clipping Mask. Voila! You’re done. Repeat for the other photos on your collage.
Man, this was a lot better than my first attempt. Hope I did not cost you too much time.
Cheers.
Bill Booth
Bill, this second explanation doesn’t really fade to transparent, though, does it? You’d need to save the chosen background color and use that for the background of the montage, right? I was hoping to be able to fade to transparent so I could just experiment with different backgrounds. Your first tutorial seems to give the transparency by changing the opacity to zero??
Franny
If you have two layers - Top Photo / bottom selection square/circle - you select the top layer and Create Clipping Mask. Result is that any pixels existing in the bottom layer will allow the corresponding pixels in the top layer to be revealed. Colour is not important.
So we make pairs of top/bottom layers. Use the marquee tool to make a selection. You may want to Refine Selection to adjust Size/Smooth/Feather. Select the bottom layer and fill the selection with a colour(paint bucket tool). Then select the top layer and Create Clipping Mask. When all your photos are paired up, you can add a background layer of whatever colour you choose. Put this layer on the bottom of the stack.


Bill Booth
Thank you SO much–I’ll try this as soon as I can!! Then I’ll post back–the fade on the oval vignettes doesn’t seem to be as much as on the rectangular ones???
Franny
The fading is a function of Feathering the mask.
Keep in mind, there is usually more than one way to do things in Pixelmator/Photoshop/whatever software. So experiment until you get what you need and get there in a reasonable number of steps. Have fun. You can’t really break anything.
Bill Booth
You can use Photoshop for this. It is providing vibrant features for image enhancement
Physiotherapy Services in Delhi
Nursing Care Services in Delhi
<a href="https://www.hometurph.com/car-spa-cleaning-services-in-delhi-ncr">Car Spa Services in Delhi</a>
<a href="https://www.hometurph.com/yoga-classes-trainers-in-delhi-ncr">Yoga Classes in Delhi</a>