Sponsored Post[?]
DxO PhotoLab 3: Redesigned Repair Tool
DxO PhotoLab 3 introduces a redesigned Repair tool, now allowing you to choose the source of your repair point, adjust the feathering and opacity of the repair, and switch between repair and traditional cloning. This is all controlled from a new Repair palette, bringing more power than ever to DxO PhotoLab for retouching your photos.
The Redesigned DxO PhotoLab 3 Repair Tool
Let’s have a quick look at the interface of the redesigned repair tool. It’s pretty straight forward, but it’s still helpful to have a look at it.
To activate Repair, click the “bandaid” (or, “plaster” if you’re English!) icon in the toolbar:

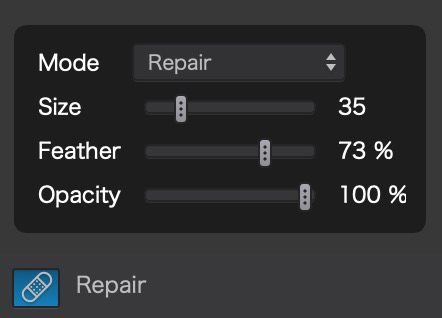
Once that’s open, in the lower left you’ll see the the new palette:

- From the top of that palette, the Mode selector lets you switch between Repair and Clone modes. You can change this before or after you paint over the object you want to remove.
- The Size slider sets the size of your brush. You can also change the brush size by scrolling your mouse while holding down Command (Mac) or Control (Windows).
- The Feather slider changes how soft the edge of the brush is. This can be adjusted after you add a Repair point; just select it, then adjust this slider to change the feathering. You can also change the brush feathering by scrolling your mouse while holding down the Shift key.
- The Opacity slider controls how the opacity of the repair or clone, allowing you to completely or only partially cover up whatever you’re brushing over. This can also be changed after you’ve already added a repair or clone to your image.
- The blue Repair icon at the bottom simply toggles the palette on and off.
Finally, on the bottom right of window, you will see a checkbox and two buttons: (post continued on DxO's Blog; link below…)
To read the rest of this article, please visit the DxO Blog!
More like this
- Tip
- Tip
- Tip
- Tip
- Tip
