PixelGenius PhotoKit for Photoshop—where the Digital Darkroom Acts Like Its Chemical Predecessor

Anybody who wants to do B&W photography today – at least the kind of B&W photography targeted at creating actual printed images for display, exercise complete control over the process, and at the same time understand exactly what they are doing in an analog or “real world” sense – should check out the PhotoKit plugin for Adobe Photoshop by PixelGenius. In my opinion, this might be the ONLY reason for a photographer to continue to, or begin to, use Photoshop at this point.
PhotoKit has been my mainstay for years. There is also a PhotoKit Sharpener [previously mentioned on The B&W Photo blog “Gallery Show “Sculpture”, Image 7 of 8” and in Live Training 106] which integrates with PhotoKit, adding even more control, which I also use. PhotoKit Color rounds out the trio of plugins. PhotoKit costs $50; extremely reasonable for something that can be the backbone of one's work. The other two run double that — not cheap, but in line with other similar plugins and apps; all of which are less intuitive and less darkroom-like in approach.
If you really want to be in control – the kind of control where you decide what you want to do or try, and then pick up the tool and do just that – try PhotoKit. As someone who spent the better part of 35 years in the darkroom (I did emerge occasionally to eat, sleep and father three kids), I can attest to the ease with which I made the transition and the degree of increase in control. PhotoKit isn't new. It's been around for over a decade; the latest version about half of that. There's very little on the internet in the way of instructions, but very little needed. You can find PhotoKit at PielGenius.com.
PhotoKit and My Workflow
The real-world darkroom had its ritual, a demanding workflow that, while hindering in some ways, held one to a constructive, creative process. Using PhotoKit in my own workflow restores the positive aspects of that while increasing control and options exponentially. That works for me.
Here goes—with a conscious attempt to avoid, as much as possible, getting into the complexities that inevitably arise.
Shooting
I shoot RAW with a dSLR, except when I use my iPhone, in which case I like to use apps that shoot TIFF or dRAW files. I prefer to use use a camera app that lets me shoot in such a way where I view in B&W and the resulting file has a B&W icon. However, when the file is imported into any app, it reverts to an RGB TIFF. I do this because, while I have no problem “seeing” in B&W looking through the viewfinder of a dSLR, this ability fails me when looking at the flat screen of a point-and-shoot camera or smart phone. Curses.
Side note: 20 megapixels or more in a dSLR with a good but front-heavy zoom lens can pick up enough vibration to be problematic, even with the mirror locked up, especially if one is looking to print large. On a tripod I found it necessary to use both a rail supporting the front of the lens and a bean bag on top in order to achieve stability. I've run extensive tests on this using hyper-focused scenics. I like quick solutions though and have very few issues with my favorite fix-it: shoot hand-held, in continuous shooting mode, for at least four shots. One is always sharper than the others, even at some pretty slow shutter speeds. I now leave the tripod home and go into the field with a light monopod.
Asset management
Apple Photos: I actually like the new Photos app, even more in some ways than Aperture. It's missing some things, but with my focus on B&W, I wasn't using Aperture for much more than filing and managing anyway. I find Photos to be potentially everything I could want.
- I file my images in the Finder in batches as shot, pretty much completely organized
- Then I import them into Photos referenced, first mirroring my storage arrangement and then expanding on that
- All image files are backed up both at home and online using Carbonite
- When preparing for a big PhotoKit edit, I'll export the Unmodified Original from Photos into a new folder, and all subsequent work will be saved there
Photoshop: I do my RAW conversion in Photoshop, making sure I have a usable starting point, and proceed to lens correction. At this point, I'm simply preparing the image for use in my digital darkroom, PhotoKit. After converting to B&W, I make sure the mode is set to 16-bit and RGB. Yes, RGB – PhotoKit will only function in RGB. From this point I am virtually standing at my enlarger, making decisions as to where I want to go with my image – targeted for printing in B&W.
PhotoKit
Again, the first thing you will notice about the PhotoKit plug-ins is that they are not launched as filters — they're under the File > Automate menu. PhotoKit is actually an “automator” of Photoshop functions. (If PhotoKit is greyed out, you probably have a greyscale image loaded). There are many different options within the PhotoKit suite.
You don't have to pay any attention to separate plug-in listings for PhotoKit Sharpener or PhotoKit Color. All Modules are utilized through the same PixelGenius Toolbox dialog.
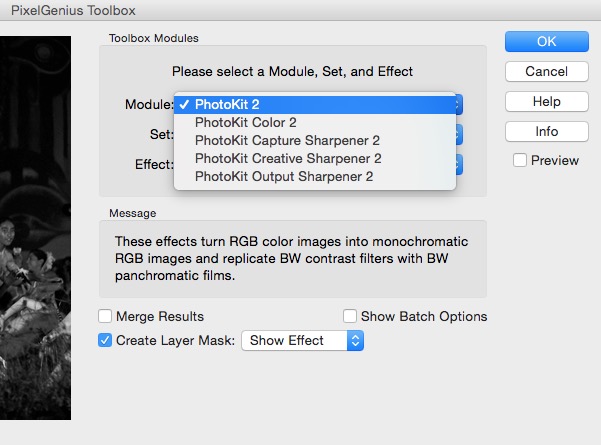 You can access all PhotoKit tools from a single dialog
When using Create Layer Mask, you can opt for Show Effect or Hide Effect, which will automatically apply a layer mask and fill it with white or black, to show or hide the entire layer, ready for you to brush the effect away or in. And as with all Photoshop layers, opacity is easily adjusted. I'll admit that I've never had the need to use the Batch Options, but they look intriguing.
 “Create Layer mask” and “Show Batch Options” are other handy tools in PhotoKit
PhotoKit Capture Sharpener is a convenient set-up step before actually getting into PhotoKit proper. (The sharpening trio are part of the PhotoKit Sharpener plug-in). This thing is cool. It lets you select the source of the image – anything from 35mm film to high resolution digital – and it takes a stab at the proper degree of capture sharpening. Then this can be adjusted with a slide bar, parts erased or brushed in, etc.
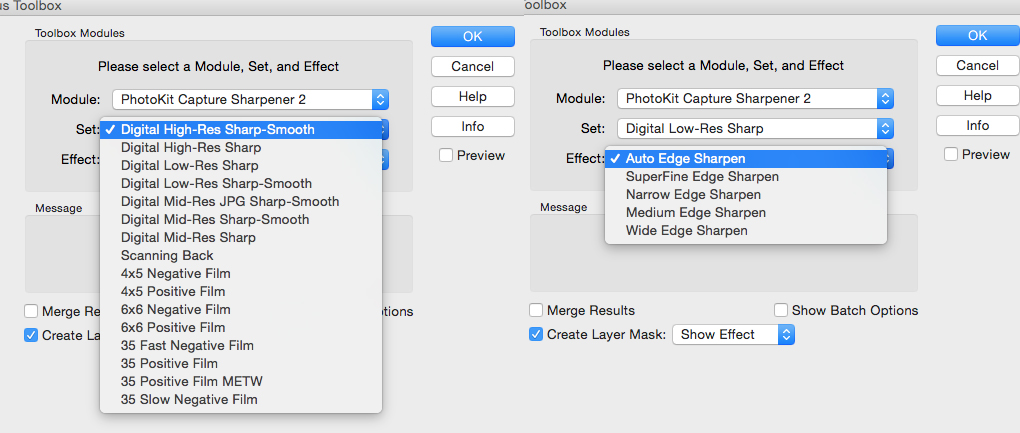 Extensive sharpening options, including “capture” sharpening, are available if you have the PhotoKit Sharpener plug-in installed as well
I usually apply Capture Sharpening immediately after any spotting (or major fixit) and, since under-doing is the rule, I often wind up setting the slider at about 50%. I almost always select Create Mask Layer > Show Effect and then check for areas where I might want to erase or diminish the effect. The Effect choices are well worth experimenting with because my favorites vary according to the source of the exposure.
PhotoKit Sets
Now let's get into the meat of what's in PhotoKit itself.
Color to B&W — The only one of these I avoid, preferring the conversion built into Photoshop. Here it's equivalent to the simple use of a color filter on a lens, again with the addition of a percentage slide bar. I imagine it would be really great for combo color / B&W imaging.
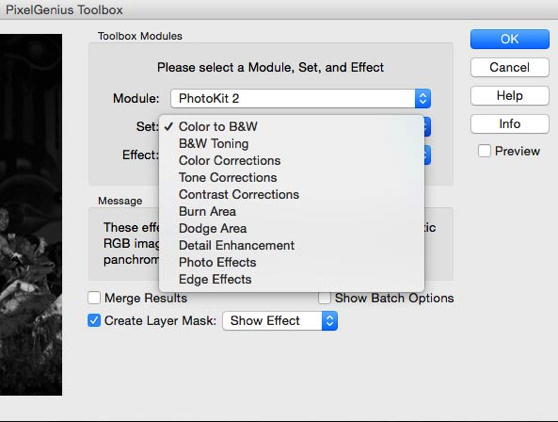 Color to B&W is here, but not very effective — I use Photoshop instead
B&W Toning — Most of them are in there. The only one I use is Platinum, and then only on what I consider my final “print” file, and only on one particular folio. The result is a great, subtle warm tone. After toning, it can require some tweaking, including punching blacks and whites, slight mid-tone contrast adjustment, slight contrast adjustment, etc.
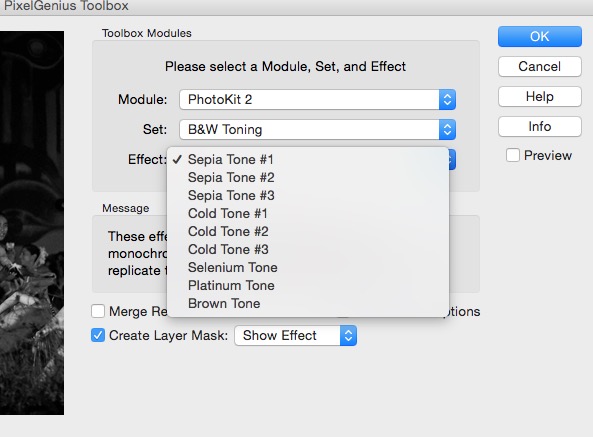 B&W Toning effects can be pretty, but the only one I use is Platinum
Color Corrections — Hardly relevant to my B&W. All in all, not nearly what is in the PhotoKit Color Module, which I've used only in Demo mode—quite impressive!
Tone Corrections — Fantastic for fine-tuning an image destined for the printer; mine is an Epson 7800. The terminology is clear and straightforward – the way one tends to see what's needed when looking at a printed test image. Of course, once a display is pretty much calibrated to come as close as possible to what the printer will turn out, much of this can be done on screen. But the critical fine tune work always has to be done after the first trial run. There must be a big difference between how PhotoKit adjusts Tone, as well as Contrast, and how Photoshop alone or other apps do this because of the results. Less damage to areas one doesn't want effected mainly. And again, it's automatically set up to either erase/diminish in areas or brush the effect in.
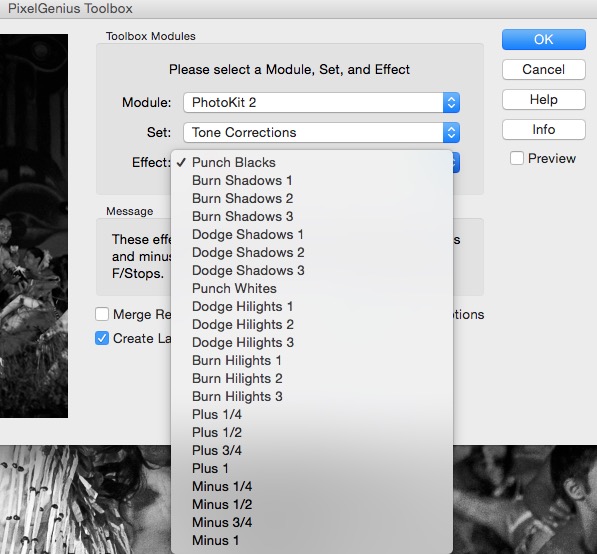 Tone Corrections are great for fine tuning an image for your printer
Contrast Corrections — What I like best about these is the subtlety of the actions. I don't know what they do different, but both Boost Contrast and Midtone Enhance have a much more “comfortable” effect than straight Photoshop—especially Midtone Enhance. Occasionally you have to pile on a couple, but the results are fantastic.
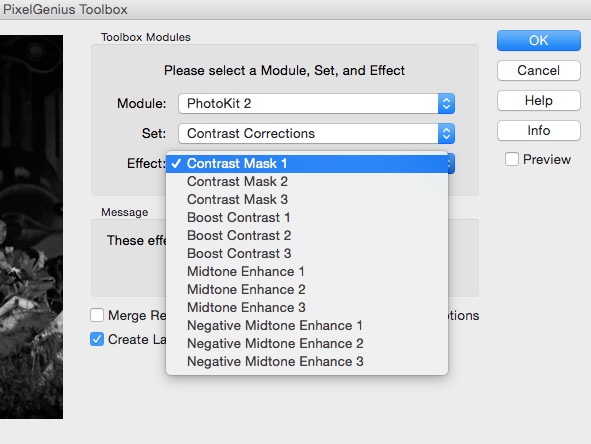 Contrast Correction is another option; subtle, but effective
Burn Area / Dodge Area — Just like in the darkroom, using cards to block parts of the light coming through the enlarger to the paper during the intital exposure, or subsequently adding exposure.
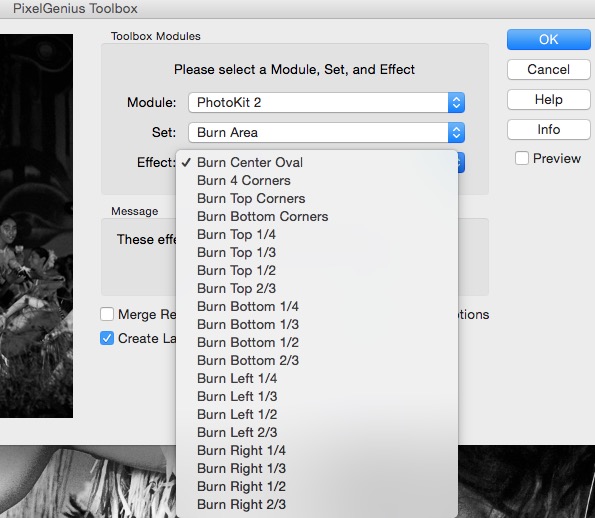 By the time I packed up my darkroom and sold it off, I had a huge stack of specifically cut burn/dodge cards cut from mat board – each labeled as to the print it was used for, for reprint purposes. These and my printing records helped tremendously, especially with PhotoKit, in the transfer to a digital darkroom
Detail Enhancement — These are sharpening tools for those who don't opt for PhotoKit Sharpener. Better and more intuitive than those in Photoshop, but not near the cool automation and control as in the Sharpening Module.
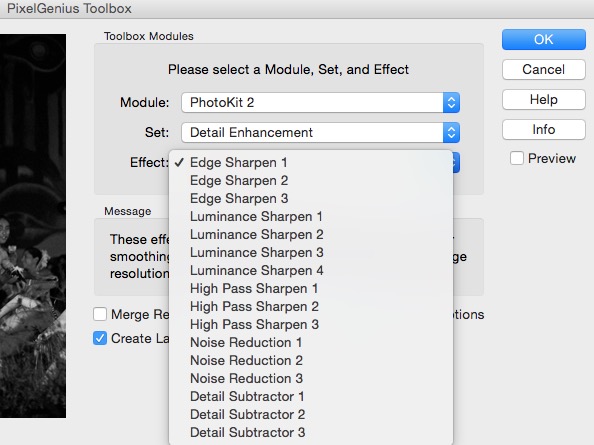 Sharpening for those who don’t also buy PhotoKit Sharpener
Photo Effects — Various degrees of: Grain / Fog / Diffusion / Center Clear Blur. While I'm not a big fan of visible grain, I do prefer the “body” present in files generated from negatives to straight digital files. A photographer friend in Chile gave me a copy of a book of color scenics he put together from mixed files (film and digital exposures). He's a big seller in Chile. I immediately noticed that I could tell the difference, and decided that I wanted to eliminate this issue in the book I was putting together of my Easter Island images—a project where I switched from analog to digital mid-stream. After some experimentation I found that it was as simple as adding “Grain 50” near the very end of the image preparation process. Largely invisible, yet if you compare the before and after images, there is a “body” to the one with Grain 50 added. The image as a result also seems sharper, fuller. Even I sometimes have to check my records in order to remember which images began life as film and which digital!
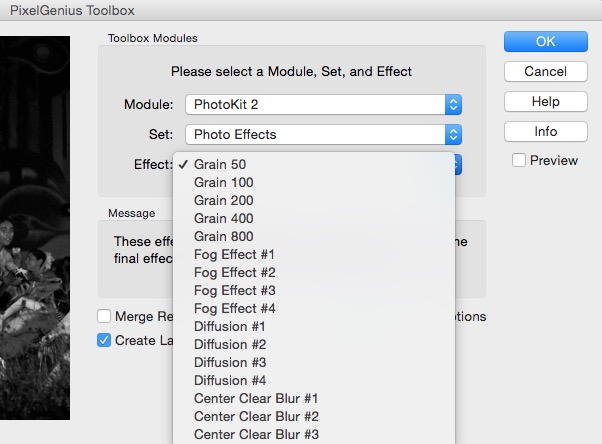 A little grain goes a long way, not adding visible grain, but an intangible “body” to the images
Edge Effects — I'm generally not big on border or edge effects, but I do appreciate being able to quickly plant a thin black border when and where it is needed and then adjust the opacity as desired.
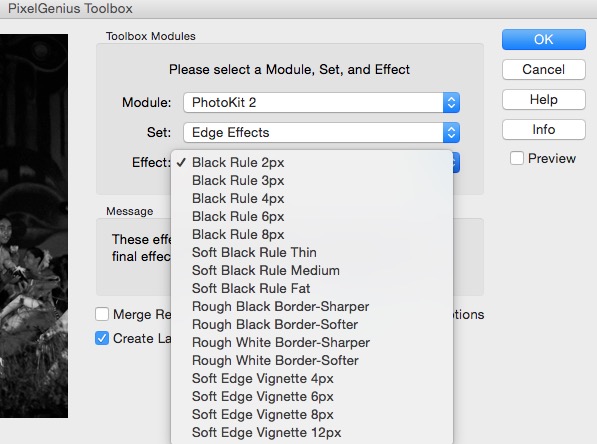 From simple borders and beyond, you have options
PhotoKit Output Sharpener — The last thing I do before printing, often limiting the effect to as little as 10%. The plug-in tries to gauge the sharpening to the type of printing, but tends to overdo the defaults when it comes to my particular printer / paper combination.
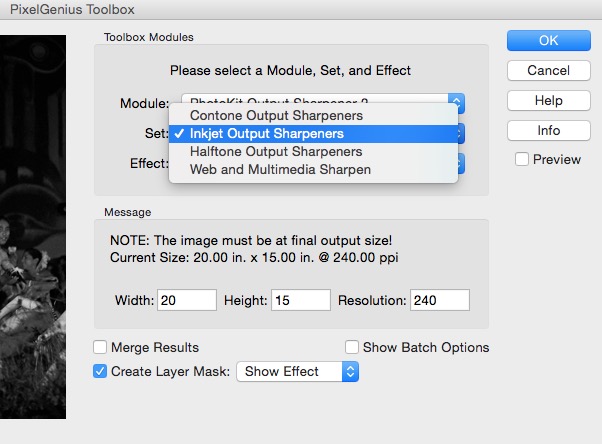 Output sharpening, in the Sharpener module, is very effective
PhotoKit Creative Sharpener — Also part of PhotoKit Sharpener. This is where one can select from a slew of types of sharpening, degrees, etc. It also looks like something of a catch-all where they threw in the proverbial kitchen sink. Sharpening is the most often overused tool in the digital tool-kit. The trick is to make a conscious effort to under-do everything. PhotoKit Creative Sharpener offers complete control. I like that. Creative Sharpener—the image saver. It has saved a couple of my images from oblivion.
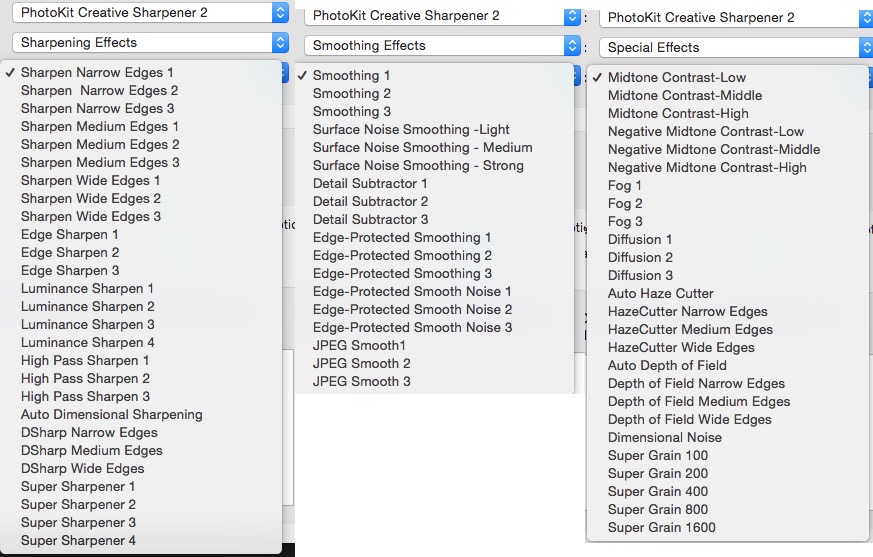 Creative sharpener; the kitchen sink of sharpening tools
I had a negative for years that I just could not print, a great shot that was very slightly blurred, due to camera shake. Any use of full-image sharpening simply made the problem worse. In Creative Sharpener I selected Sharpen Wide Edges and carefully brushed the effect in along the edges that needed to be sharp. The result is an image that I print 16x24, and looks like a razor sharp image with a tad of smoothing over “the rest of the image”.
Interpolation
Resolution is the elephant on the room when it comes to preparing B&W images for print. Nothing beats Alien Skin Blow Up (again an automator, not a filter) for the tricky ones. The printer outputs at set resolutions—240, 300, 360 dpi. This makes for a lot of small up-adjustments that require no special treatment and can be done in Photoshop, if the increase isn't much more than 10 to 25%. I can also opt to print at 240 dpi instead of my usual minimum of 300. Printing at 1400 on my printer the difference is indistinguishable with a 10x loupe.
I regularly get 18x24 prints from older 12.8 megapixel files. In fact, I've had special orders for 24x30 images (as far as my printer will go). This calls for some serious interpolation. My gut tells me to do this early on, and if I know it's coming I do just that. But I've gone back in to a finished file meant to print at 15x20 and interpolated up with similar results.
Of course, there's always the issue that B&W printing screams for slightly different treatment at different sizes. often requiring multiple print files. Not to mention what you have to do to a B&W that's been optimized for the web in order to make it presentable,
Editor's Note: Several years ago I did a series of large B&W prints which were up to 60 inches wide, shot originally on medium format digital (38 megapixel originals) but still scaled up for 300 dpi printing. As the author's gut suggests, scaling early in the process worked out great. I did basic retouching first, then scaling, then toning, smoothing, grain addition, etc. If you're adding grain for effect, it's especially critical to do that after the image is scaled, otherwise the effect will change.
More like this
- Tip
- Tip
- Tip
- Tip
- Tip
