The Aperture 3 “Open in Editor” Options—TIF vs PSD, 8-bit vs 16-bit, sRGB vs Adobe RGB, and TIF Compression Options
Since the very beginning of Aperture, you've been able to open any photo from Aperture into another editor. For a lot of people, that means Photoshop. However any app that supports the .PSD or .TIF format can be used. This process is called “round tripping”.
There are only a few options to configure, buy wow can they be daunting. This post is going to get pretty technical in parts, but I promise an easy summary at the end.
And because this post will probably trigger debates, I reserve the right to change my mind. I'm not a color expert. There are reader who will likely comment below that know far more about color than I do. But I feel I've proposed reasonable solutions for the majority of people.
So let's get started.
The round trip
Let's start by defining what we're actually talking about here. When you open a photo from Aperture into another application, then save it and automatically return to Aperture, this process is called “round tripping”. Here, in brief, is how it works.
- Set up your Aperture preferences to choose the editor application, format, and color space you want to use. For most people, this is a set-it-and-forget-it step.
- Right-click on a photo and choose Edit with [your chosen app]. Aperture will automatically create a copy of your photo, with any edits you've made in Aperture baked in, save it as a TIF or PSD file (as set in the preferences), and open that file in your chosen app.
- Do whatever you want to do in that editor app.
- Save the changes (which should always simply save, not ask you to save as — if it does, something is wrong. Scroll to the “More miscellaneous” questions at the end of this post).
- Switch back to Aperture, and voilà, your photo shows up there, with an “externally edited” icon on it.
- You can at any time re-open that file in your editor again, and all of your layers, channels, etc. will be preserved.
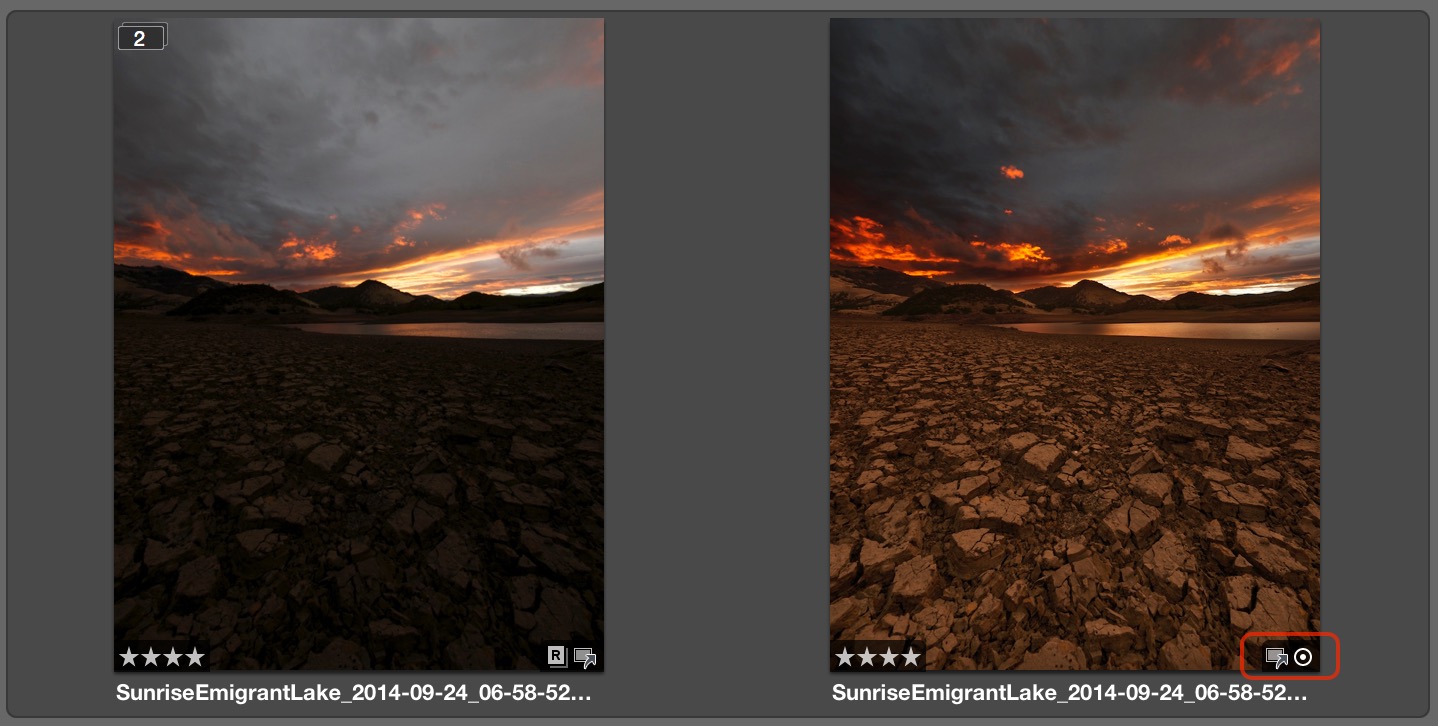 The target icon (circle with the dot in it) means the photo has been externally edited and can be re-opened in your editor
Of course there's lots of little variations along the way, so let's check out the options, setup, and usage, one piece at a time.
Aperture preferences
First let's take a look at the Aperture 3 preferences, found under the menu Aperture > Preferences… > Export and break it all down.
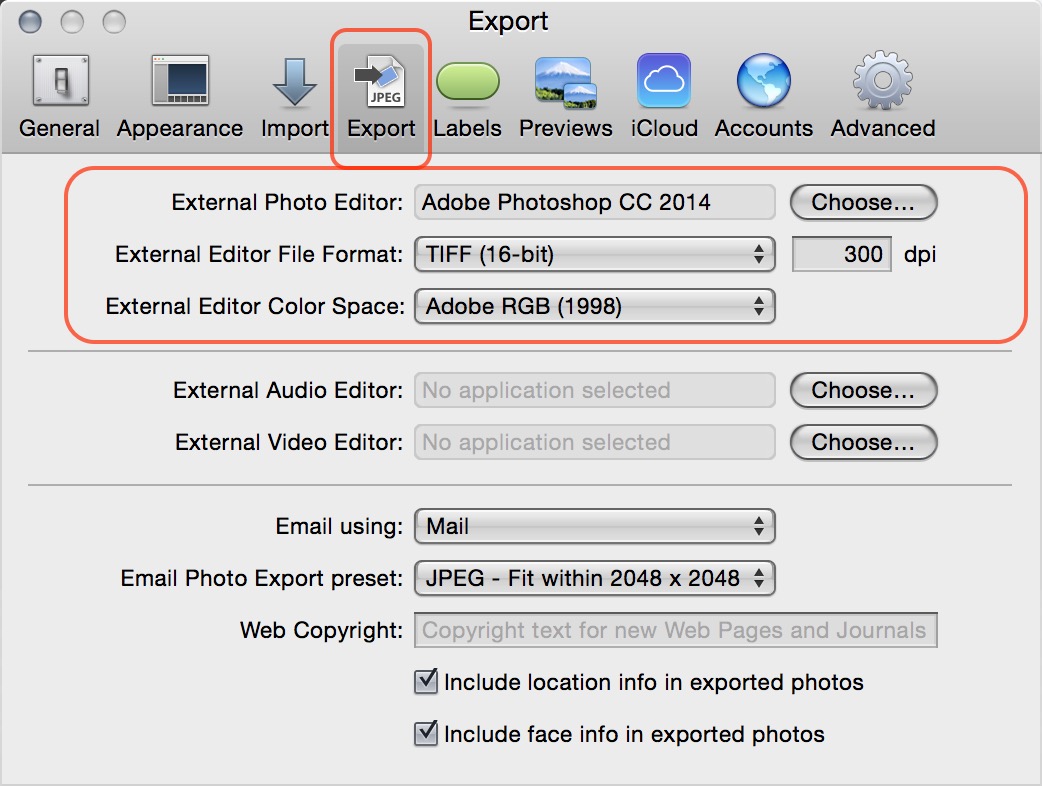 The Aperture 3.6 Export preference pane
External Photo Editor
This is where you choose what editing app (application) you want Aperture to use. You can change this at any time by going back to these preferences. (If you often want to switch between apps being used, check out this tip, “Multiple External Editors in Aperture 3—a Work-around”). Because the only formats we can choose to export are PSD and TIF, you can't just select any old app here. For example, when prepping this article I wanted to use Pixelmator as an external editor. Unfortunately if you do anything fancy at all in Pixelmator, you have to save it as a native Pixelmator app format, which a) Aperture doesn't read, and b) would have to be saved back outside of Aperture, which kills the whole round-tripping vibe.
Most people will choose Photoshop or Photoshop Elements, but again partially what inspired this post is the ever-growing number of third party apps of all sizes. As long as the app supports TIF or PSD, it will work. And even if it doesn't, there are some methods you can employ to include these apps in your workflow and still keep it all managed by Aperture. More on that later, under “Using non TIFF and PSD apps”.
External Editor File Format
You have four choices here:
- TIFF (8-bit)
- TIFF (16-bit)
- PSD (8-bit)
- PSD (16-bit)
The differences between TIFF (also written TIF) and PSD are minimal. There's a long sordid history of the TIFF format, but today it's controlled by Adobe, and appears to be able to do everything PSD can do, with the added benefit of compression choices. I've taken to using TIFF instead of PSD based on the advice of another user on this site, mainly because of the idea of future-proofing the files, but also because it can save a lot of space. TIF is universal and can be read by just about anything. Even if you don't have access to the Photoshop layers, you'll still have a readable flat file. However with PSD, if you don't have Photoshop anymore, there aren't a lot of apps that can read their format. Makes sense to me.
If you choose TIFF though, you will be presented with a litany of compression options the first time you save in Photoshop. That's not a problem; it's just an extra step and something you'll want to make the right choice on. This is actually a benefit if you're doing this a lot since you can make your files quite a bit smaller by saving as TIFF and save considerable space down the road. I'll come to that later.
Choosing between 8-bit and 16-bit is an important choice, and somewhat depends on what you expect to do to, and with, the files. This is a huge discussion which has been bantered about on here in forums and comments before, and I'm sure this post will trigger another great conversation on it. Getting into a big technical comparison here isn't what I want to do in this post, so I'll break it down like this. 16-bit files are bigger, and slower to work with, than 8-bit. They also have the potential to be higher quality, if you push and prod and stretch your file beyond the range of 8-bit. Storage is cheap and computers are fast, so hey, why not go 16-bit, right? Except that when you output that final JPEG to send to your favorite print lab, it's all slammed back into 8-bit space. So the 16-bit is really about the space you're working in, not the final output. Confused? Yeah, me too. How about this…
Level 1 — If you're just using Photoshop as a better retouching tool, or to add text to your files, and are more interested in keeping everything as nimble as possible — then stick with PSD (8-bit).
Level 2 — If you really push your files, and you print big prints, and color is really critical to you, and storage isn't a problem — go TIF (16-bit).
What do *I* do?
16-bit. Because I can. Most files I send to Photoshop probably don't need it, but I have a fast Mac and storage is cheap, so why not. And always TIF, because it's more future-proof and saves space.
OK readers, start your debating engines now ;-)
Oh and the resolution is irrelevant. Whether you choose 100 dpi or 1,000 dpi, the file doesn't change. This only matters when you go to print and and even then it only matters if you're printing from Photoshop, and you can readjust as necessary there.
External Editor Color Space
Oh man, why did I start this article. You're familiar with Pandora's Box? That's what this is.
You can choose form a long list of color space choices here, but there's only two that you would normally use — either sRGB or Adobe RGB (1998). So which should you choose?
Here's some basic bullet points:
- Adobe RGB (1998) is a bigger color space, capable of displaying more colors than sRGB. (yay, Adobe RGB!)
- Your camera can shoot in either Adobe RGB or sRGB, and out of the box was set to sRGB. (wait, what, why?)
- Your monitor can display about 97% of the sRGB space, but only about 75% of the Adobe RGB space. (so why have color space I can't see?)
- The web is based on sRGB, so if you upload an Adobe RGB file, it won't look the same. You have to convert to sRGB first. (sounds easy enough)
- But when you convert to sRGB, your colors can shift. (oh, crap)
- You can shoot in Adobe RGB and “downgrade” to sRGB, but you can't go the other way. Well you can, but you won't gain anything. Think of it like saving a TIF as a JPEG. You throw away data when you do that. Sure you can convert that JPEG back into a TIF, but you're not going to magically get data back again. (at least that makes sense)
- If you're a hyper-critical printer with your own regularly calibrated printer and displays, you can work safely in Adobe RGB. (that's me! No not really…)
- If you're ordering your prints from BayPhoto, Millers, or any other online lab, almost all of them want sRGB JPEG files these days. That seems counterintuitive, but it's true. (that's easy then, let's go sRGB!)
- Some really smart people, like Ken Rockwell, say to go with sRGB. (oh good, another point for sRGB… so sRGB it is!)
- Some really smart people, like those that run Fstoppers, say to go with Adobe RGB. (oh for cryin' out loud…)
See? Pandora's box. It's enough to make you want to give up on this whole digital photography thing and take up knitting. Although there's probably just as much debate over yarn styles and thread count and other things I'm just making up now.
So here's what I'm going to suggest.
Level 1 — For most people, sticking with sRGB is safest and easiest. I say safest because your colors won't shift unpredictably when you put them on the web, and I say easiest because if you're ordering prints from any online printer, that's probably what they want.
Level 2 — If however you're more technically minded, are doing much of your final output from Photoshop (either to print yourself or to do specialized web output or to do CMYK conversions), are comfortable with watching for shifts in color as you go from one space to the other, then work in Adobe RGB (1998).
What do *I* do?
I've always had my cameras set to Adobe RGB (it's one of the first things I change when I open a new camera). If I print, I do specific scaling and sharpening using Photoshop and other tools, so I have a critical eye on it (I don't print myself at all; I just prep files to precise specs for the print house I'm using). If exporting directly from Aperture for the web, I always look at my files before uploading to ensure the colors didn't get munged—and they don't or barely do; perhaps Aperture's conversion is really clean. I've been happy with this workflow, and don't see any reason to change it.
Just to add another fun nugget to this… go research ProPhoto RGB. See now you're really confused.
So what are those settings again?
Here's my simple summary advice…
Level 1 — If you do nearly all of your work in Aperture, and only occasionally go to Photoshop or some other app and what you do there is retouching, adding text, or other relatively simple work, then stick with PSD (8-bit) and sRGB color space. No fuss, no muss, and you'll never have to deal with unexpected color shifts.
Level 2 — If you're a more advanced user who's pushing your files to the max, paying keen attention to every detail when printing, and are the type to request color profiles and precise optimal file settings from your print house before sending a file to them, then go with TIFF (16-bit) and Adobe RGB (1998).
But wait! There's more…
Unfortunately that's not the complete story. If you've decided that sRGB is for you, then skip this section. But if you're going to work in Adobe RGB, then you need to change a setting in Photoshop as well.
Photoshop has a default color space that it's set to when it's installed. You can view and change those settings under the menu Edit > Color Settings…. By default, if you're in North America, it's likely set to North America General Purpose 2, which includes a working RGB color space of sRGB. D'oh! But we want Adobe RGB, right?
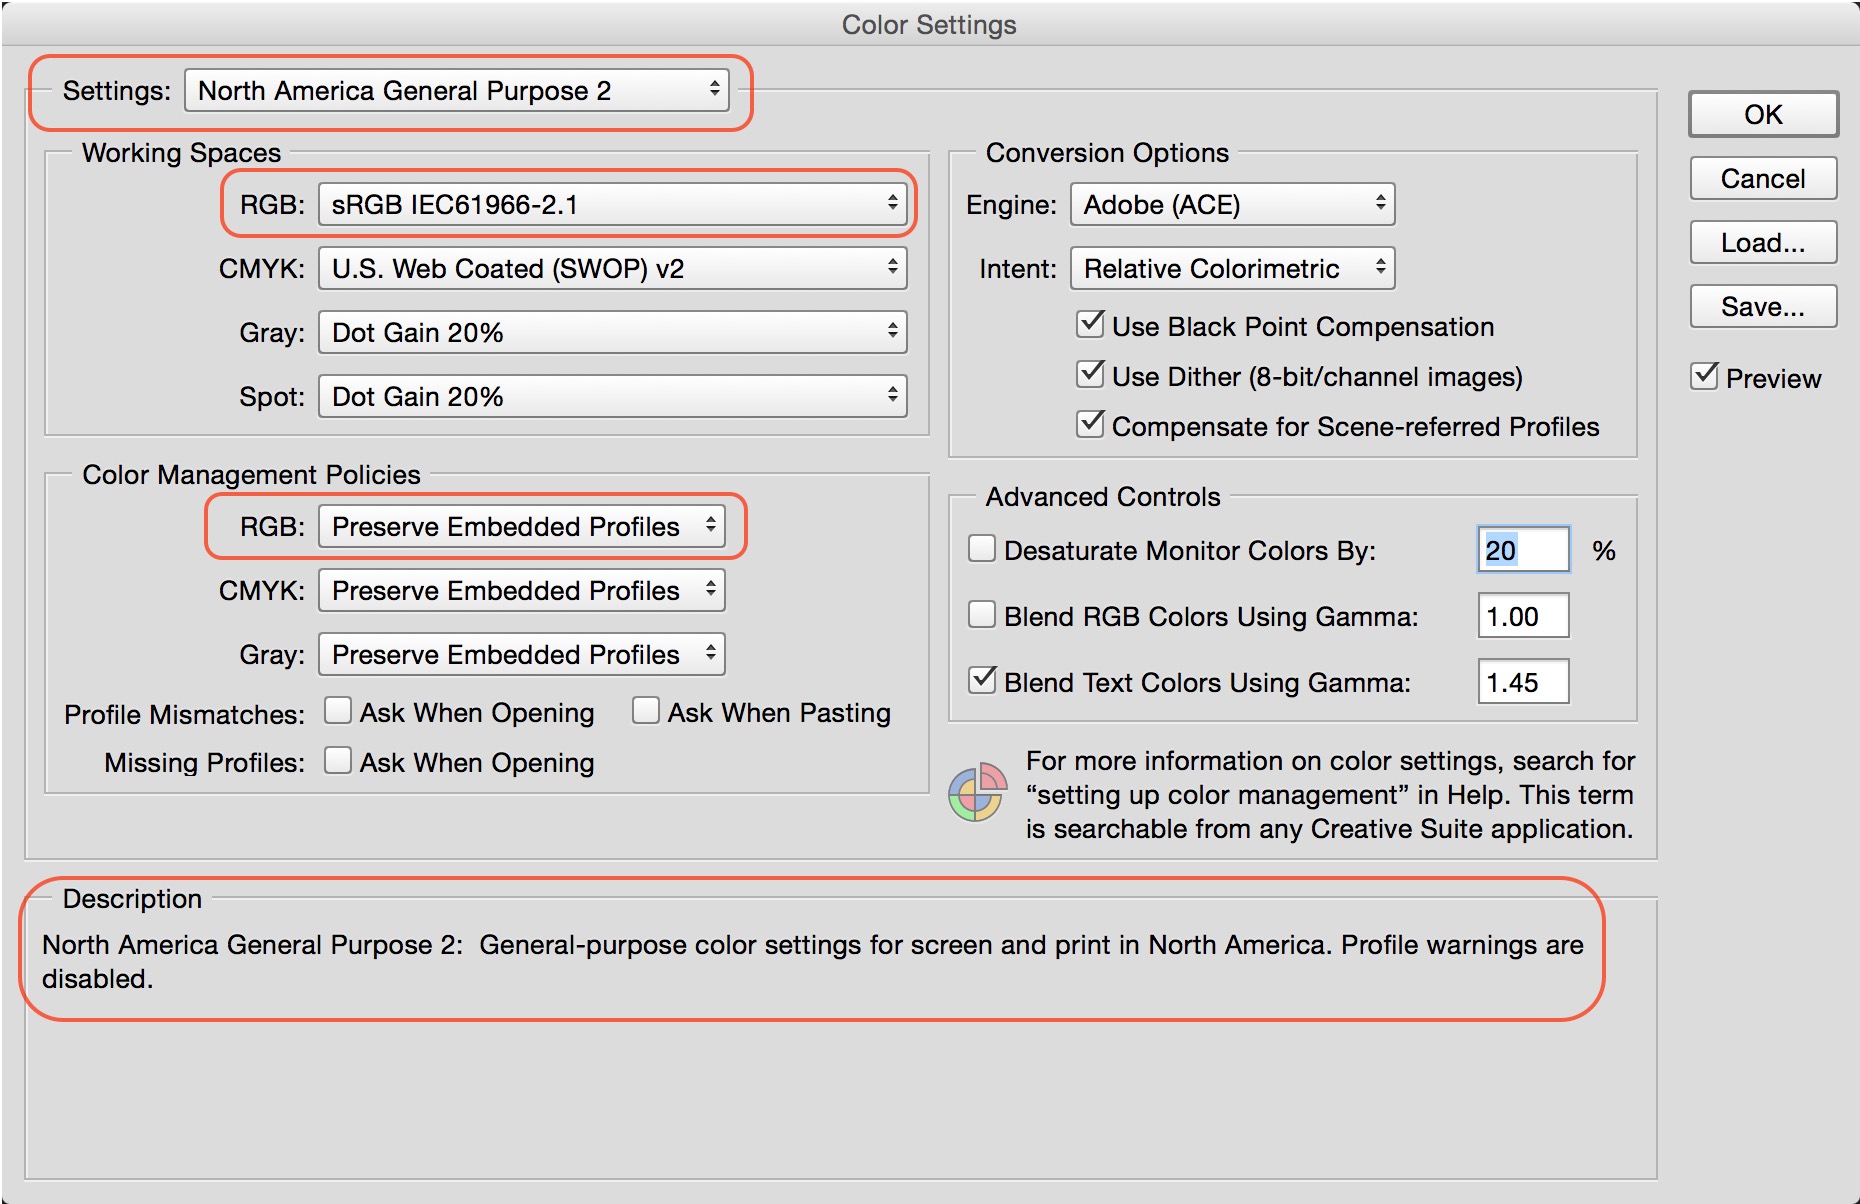 Photoshop’s Color Settings are by default (at least in North America) set to North America General Purpose 2, which includes an RGB working space of sRGB
If you've decided to go with an Adobe RGB workflow, then yes, you do. So change that Working Space: RGB drop down to Adobe RGB (1998) and your Settings will become Custom and all will be right in the world.
 Changing your RGB settings to Adobe RGB if you’re working in that space is pretty darn important
Also by leaving the Color Management Policies to Preserve Embedded Profiles (see previous screenshot), whatever you send to Photoshop (even if the file has sRGB embedded, i.e. it came off your iPhone), Photoshop will leave it alone. If you're getting profile mismatch warnings, this dialog probably got bumped off its default setting.
So I've sent a TIFF to Photoshop…
Now let's talk about what happens in Photoshop. I said in the beginning that if you choose the PSD file format, when you hit save, it just saves, and that's all there is to it. But if you choose TIF, when you first hit Save in Photoshop, you'll see this dialog:
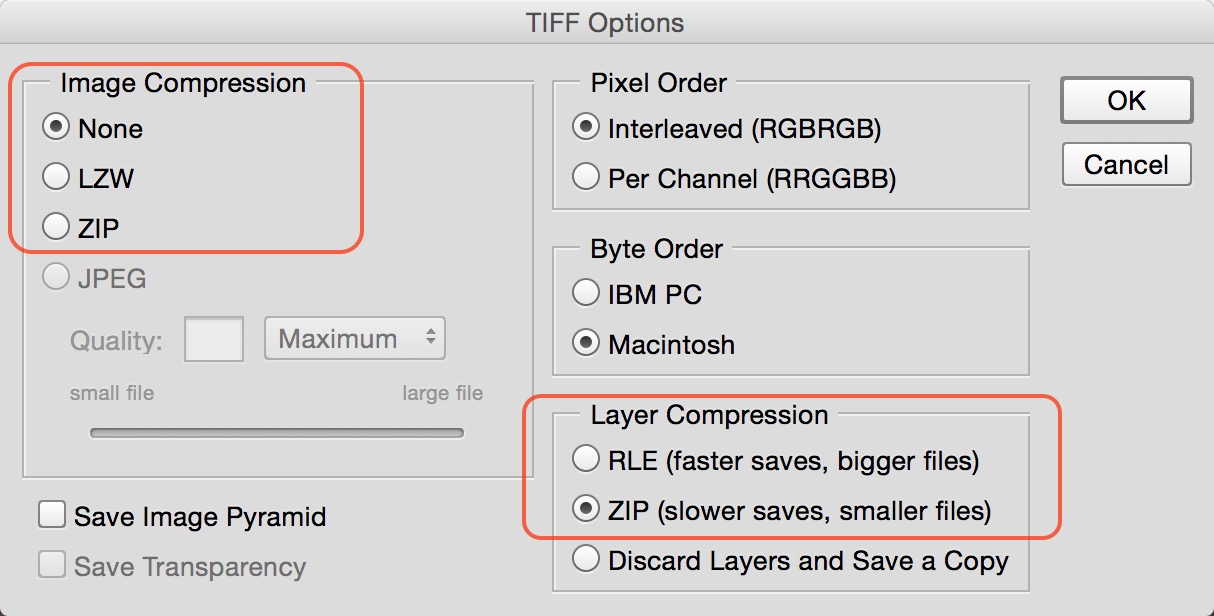 When saving a TIF file in Photoshop, even one that was sent there from Aperture, you’ll see this dialog
That's a lot of options! The ones highlighted are the ones you'll want to pay attention to; Image Compression and Layer Compression.
I decided to run a little test and chart out the differences in savings. I did not time the saves, however in general, the more the image is compressed, the longer it will take to save.
I created two files and saved them out in every possible combination of Image and Layer compression. The simple file consisted of just a single layer, and nothing else. The complex file had multiple layers, smart objects, smart filters, text layers, masks, paths, and more.
The baseline file has no image compression, and RLE layer compression (which as you can see in the dialog above, says it creates larger files but saves faster), and is highlighted in red below, as the baseline 100% size. I also saved a PSD file, which is only a tiny bit smaller than the baseline TIFF file (how convenient). The green highlight represents the most compressed file. But there's more to the story than that.
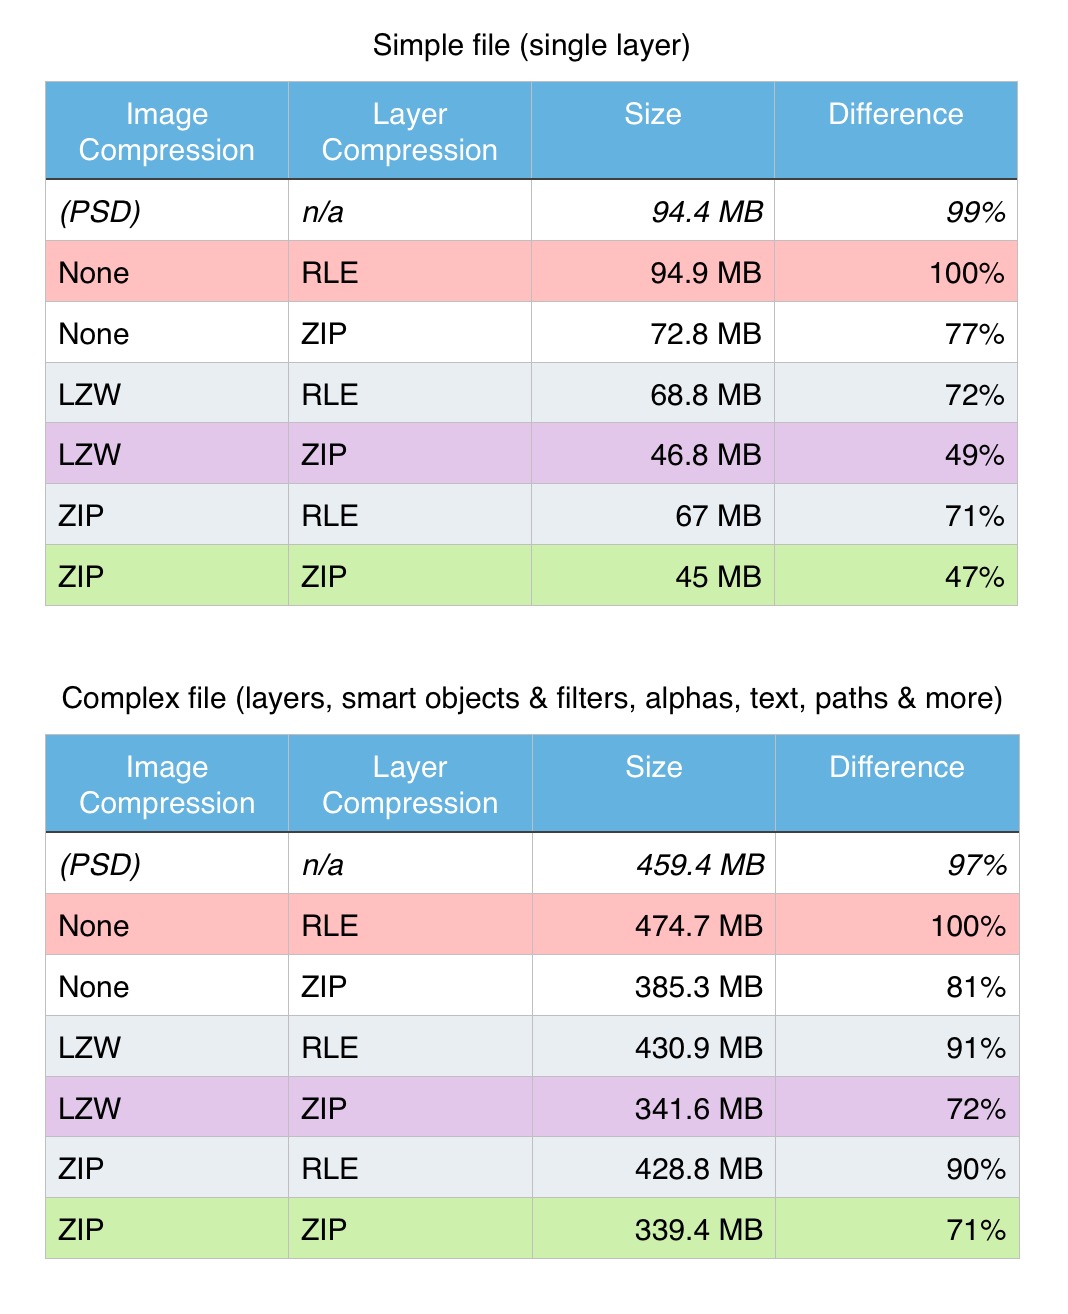 What TIF compression settings you choose will make a huge difference in the final file size
While ZIP–ZIP is the smallest file, it's not smallest by much. The LZW–ZIP compression is only slightly larger, however it saved considerably faster than the ZIP–ZIP file. Also when saving with ZIP Image Compression, you're met with this dialog:
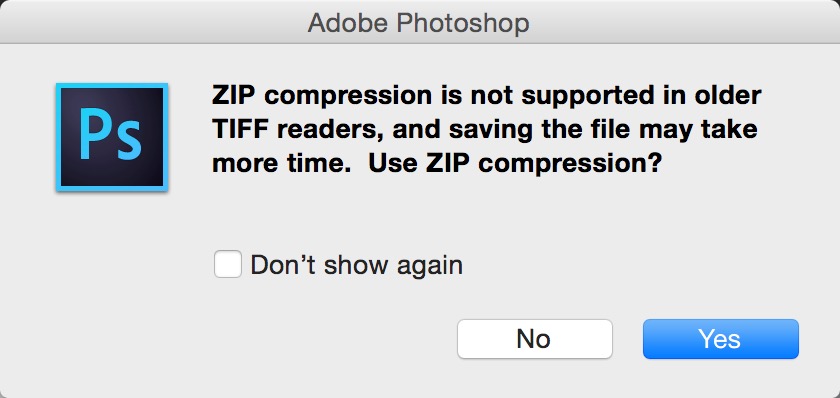 This is the warning you’ll see when trying to save with ZIP Image Compression
So for my money, I suggest the LZW-ZIP. It saves faster, is negligibly larger, and is a more widespread file format. That's the purple line in the charts above.
If you're wondering about the LZW compression, this is lossless compression (unlike JPEG, which is a lossy compression). Lossless means you are losing no details, colors, sharpness, etc. It looks the same as the uncompressed, just smaller. You can read up on LZW on its Wiki page if you're so inclined.
What do *I* do?
It's LZW-ZIP for me, nearly every time. Unless I'm in a big hurry and I know this file will be short lived on my computer; in that case I may switch to None-RLE.
Why are those files so big?
You may be wondering why those files in the chart above are so big in the first place. Even the “simple” one started life at a whopping 94.9 MB. That same image as a RAW file in Aperture was only a 19 MB, 16 MP (megapixel) file. And the JPEG version was only 7.5 MB! How did it increase 5× by converting from RAW to TIF or PSD?
This is one of the great benefits of the modern RAW workflow. It used to be that every file you worked on had to be converted from RAW to something else before you could do anything to it, and so every file became 100 MB or so just by opening it and making a layered file. The RAW file isn't an image; it isn't red and green and blue pixels, it's just raw data. Data that has to be translated into an image. The RAW file is very efficient and small but has to be decoded to be viewed. Aperture (and Lightroom, or any RAW viewer) decode that on the fly, and then add any other instructions to the recipe that you've applied (exposure changes, color changes, cropping, etc.), and render that image to screen. That 100 MB (or much bigger) file does exist, but it's temporary and kept in RAM. As soon as you move on to other images, that image is thrown away to make room for another one. And if you go back to it, it's all repeated. This would be painfully slow (and used to be), but the reason Aperture could exist in the first place is computers got fast enough to render this in realtime and keep you from having to generate and save those 100+ MB files for every single photo.
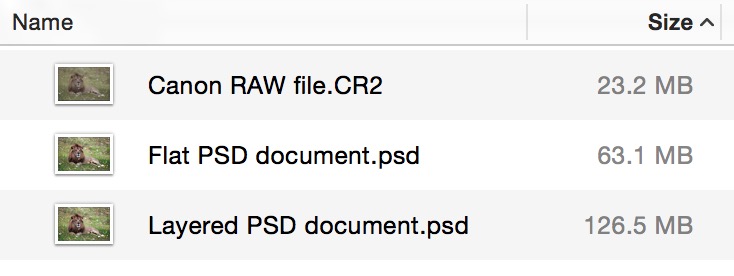 RAW = 23.2 MB… flat PSD = 63.1 MB… and layered PSD = 126.5 MB!
However as soon as you go to Photoshop (or any other TIF or PSD based app), all that goes away. Now you're back to the world of cold, hard, heavy pixels, which need space to live. And as you add layers and channels and text and more to your file, the file size just gets bigger and bigger. I have photos that are over 2 GB in size for some of my work. Ouch!
Using non TIFF and PSD apps
Perhaps there's an app you really want to use that doesn't save as TIF or PSD (or at least can't for its own native cool features), such as Pixelmator. Just because its native files aren't recognized by Aperture doesn't mean you can't use it; it just means you can't store its native files in Aperture.
This also happens if you make a file so big in Photoshop that it can't be saved as a PSD file, and has to be saved as PSB instead (PhotoShop Big document). Remember those 2 GB files I mentioned? Yeah, those are PSBs.
The solution is kludgy but it works.
- Save your .NotSupportedByAperture file anywhere you like, however I'd recommend saving it in the same folder as your other Aperture originals (if you're working referenced) or at least in a dedicated Originals folder if you're not.
- Also save a .JPG file of this image. It doesn't have to be full size, and it doesn't even have to be of the finished file (although if/when you do finish the image, you'll probably want to make a final JPEG), and save it alongside the .NotSupported file. Do be sure to save it as the same name; that's important.
- Import that JPEG file into Aperture into the same project as the RAW file that birthed this image. Here's the important bit—import it as referenced. This is critical. The easiest way to import as referenced to the exact location you want is to drag-and-drop it while holding down the Command and Option keys. Didn't know you could do that? Read this old tip; “Importing to Aperture as Referenced—with Drag and Drop”.
- Stack this JPEG along with your RAW file. Just select both thumbnails and go Stacks > Stack. This way they will always be together (awwww).
- Now from Aperture, whenever you want to open that original .NotSupported file in its fancy app, simply…
- Select the JPEG
- Choose File > Show in Finder (I've remapped my keyboard shortcut for that to Command-R).
- You're now looking at the JPEG in the Finder, and if you followed directions and named it the same as the .SomethingElse file, it'll be right next to it. Just double-click that to open in its own app.
- When done making your changes, you can decide if it's worth updating the JPEG file, or just leaving it as-is. If you save a JPEG and overwrite the one that's there, Aperture will probably recognize it and update the thumbnail in Aperture. Nice.
- For a bonus, add something to the comments or even the Aperture version name like “Original file is a .PXM”, just as a reminder for years down the road.
 Aperture on the left, and the Finder on the right; this .JPG file is referenced in Aperture, and living next to it in the Finder is the unsupported .PXM Pixelmator file
More miscellaneous questions and points of interest…
Here's a bunch of other random questions and points that came up as I was writing this article…
Why do I see color profile mismatch warnings in Photoshop?
Photoshop has a default color space that it's set to when it's installed. You can view and change those settings under the menu Edit > Color Settings…, and it probably got changed somehow. Scroll up to the “But wait! There's more…” section above and read that. Specifically it's the “Color Management Policies” you want to look at.
What if I don't want this huge TIFF file in Aperture anymore?
If you've done all this work in Photoshop or wherever and don't want to save the editable file anymore, you can output that as a JPEG (or anything else), reimport that into Aperture, and have the smaller, flat file. Those steps can be entirely automated using our handy-dandy “Convert Master File Format” AppleScript.
I though I did everything right; why am I seeing a “save as” dialog?
When you open in editor, a new file is created by Aperture and opened in your app. You make changes to that file, and hit save. It's supposed to just save back to Aperture, and that's all there is to it. But sometimes you get a “save as” dialog, which means no matter where you save it, it won't be in Aperture as an externally edited file. There's a couple reasons this can happen.
If you made changes to the file that aren't supported by the current format, this will happen. At the top of this post I mentioned that I wanted to use Pixelmator as an example for this article, however it turns out that even if you send it a TIF or PSD file, unless you want to save a flattened file back to Aperture, you have to save it as a .PXM file, which Aperture can't read, so has to be external (see “Using non TIF and PSD apps” above if this is a necessary issue for you). So whatever app you're using, if you do something to the file that isn't supported by TIF or PSD, you're going to get that message.
Another possibility is a permissions issue. If your disk permissions aren't set right, Aperture may create a TIF or PSD and successfully send it to Photoshop, but then Photoshop won't have the permissions to save back to it, and you'll be presented with a “save as” dialog. If that's happening, here are a few possible fixes:
- Open Disk Utility (in your Applications > Utilities folder), select your disk and select Repair Disk Permissions. In general you should run this over and over again until you see no more corrections made.
- Launch Aperture while holding Command and Option keys, and select Repair Permissions. You can read a lot more about this powerful maintenance dialog in this FAQ entry.
- If your Aperture library is living on an drive other than your internal drive, it may be easiest to simply enable “Ignore ownership of this volume” in the Get Info panel if you don't need any special permissions applied to the drive.
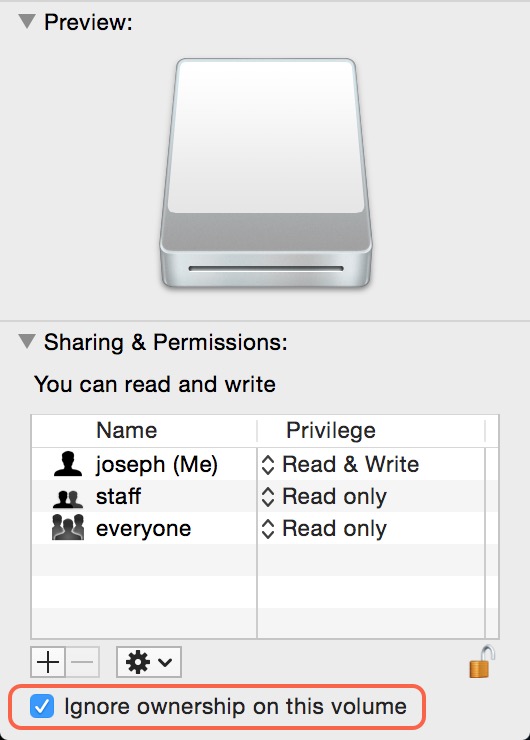 Set “Ignore ownership on this volume” on external drives if you don’t need special sharing permissions in place
The “open in editor, again” tip
This is another old tip about opening and re-opening files in external editors (and plug-ins), specifically when coming back to Aperture, doing work there, then sending it off again. It's called “Open in Editor or Plug-in… Again” and is definitely worth a read.
The Simple Summary
As promised, the simple summary again.
- For most users, set the Aperture preferences to PSD (8-bit) and sRGB.
- No need to do anything to your color space in Photoshop, but if you want to verify it's right, go to menu Edit > Color Settings… and make sure it's set to North America General Purpose 2.
- For more advanced users (you know who you are), choose TIFF (16-bit) and Adobe RGB (1998).
- In Photoshop, change the Color Settings to Working Space: Adobe RGB
And that's all you really need to know :-)
Wow!
This tiny little “open in editor” post got a bit out of hand, but with any luck this'll be the definitive guide on the topic. If I missed anything, let me know in the comments and I can update the post!
More like this
- Forum
- Tip
- Forum
- Tip
- Tip

Comments
on October 30, 2014 - 9:30pm
Superb post.
I think myself an advanced user but have been confused by what to expect during round tripping for a long time - and uncertain of preferred options.
Really good clear explanations helping me at least choose the best options for me.
Many thanks
on October 30, 2014 - 10:57pm
Pixelmator works OK with Aperture in it’s current version (and I don’t remember at which version that changed). I’m successful use 16-bit TIFFs and the ProPhoto color space.
Bob
----------
Bob Rockefeller
Midway, GA
www.bobrockefeller.com
on October 31, 2014 - 7:05pm
I have seen many “Heavy Hitters” in the Photoshop realm recommend using TIFF over PSD for varied and legitimate reasons. The beauty of the system of round tripping to Ps that both Adobe and Apple gave users ample choices capable of meeting a broad spectrum of desires and needs for many possible workflows.
What do I do? …
I set my camera to capture Adobe RGB (1998). I have Aperture and Lightroom to open my NEF files in Photoshop in 16 bit ProPhoto RGB because it offers the widest possible color gamut with a 16 bit file … I would set my camera to capture ProPhoto RGB, but that isn’t an option.
Why? … Because I often don’t know going in where and how my images may be used by a client, so I set the color gamut and bit depth to the highest possible to give me the broadest options possible in order to pull the most out each pixel. Not to mention, I shoot in some very tricky low light and mixed light situations. Having the wider gamut and higher bit depth offers more latitude in color correction, noise reduction and sharpening options.
I serve clients that need images for use in offset printing for books, magazines, newsprint, canvas prints as well as standard lab and inkjet prints and online use. Having the maximum color gamut and bit depth at the start, allows for a wider array of options getting to the finished product.
That said … I am acquainted with more than a few very successful and talented wedding, sports and event photographers that never shoot, edit or deliver anything but 8 bit sRGB image files. (keep in mind they still use tiff/psd files for editing in Ps as needed)
If I were only providing images for lab prints 8x10 or smaller and online use, I would certainly entertain switching to the latter situation as it would afford some benefits in time and space savings worth consideration.
on November 13, 2014 - 1:48pm
I use PSD 16 bit so that I can use smart objects in OnOne Photo Suite 9. They don’t work with TIFF.
Cheers,
Martin
on June 4, 2015 - 6:08pm
Does it make any difference when selecting either, Apple RBG, or sRBG IEC61966-2.1?
Reference using a MBP
Tom
on June 5, 2015 - 7:39pm
That question should be covered under the section “External Editor Color Space” in the article above.
@PhotoJoseph
— Have you signed up for the mailing list?
on June 5, 2015 - 7:57pm
Hi Joseph,
I did read the article, but being the AR type I am, my version of Aperture (3.6) only offers one type of sRGB, called, “sRGB IEC61966-2.1”. I can’t find just a, “sRGB”. And, of course, there’s the selection for, “Apple RGB” to choose from.
Just curious if the, “sRGB IEC61966-2.1” is correct.
Thanks for replying,
Tom